
Easy Baked Mini Egg Easter Cheesecake Recipe: A Springtime Delight
Crafting a delightful baked mini egg easter cheesecake promises a sweet journey into festive indulgence.
Chocolate lovers will adore this miniature dessert that captures spring’s playful spirit.
Delicate cream cheese mingles with crushed chocolate eggs, creating a tempting treat.
Light and creamy textures dance across your palate with each delectable bite.
Pastel-colored decorations transform ordinary cheesecake into a whimsical celebration of seasonal joy.
Compact yet luxurious, these individual desserts bring elegance to any Easter gathering.
You can easily impress guests with this charming and irresistible confection that sparkles with holiday magic.
Mini Egg Cheesecake That’s As Cute As It Is Creamy
Cheesecake and Mini Egg Combo Ingredients
Crust Ingredients:Filling Ingredients:Topping Ingredients:Baked Mini Egg Easter Cheesecake – How to Prepare
Step 1: Warm Up The Oven
Crank the oven to a toasty 350°F, getting ready for some sweet magic.
Step 2: Create Crumbly Crust Base
In a mixing bowl, combine:Stir everything until the mixture starts clinging together like best friends.
Step 3: Shape The Crust
Slide the crumbly mixture into a 9-inch pie pan and press firmly across the bottom and sides, creating a perfect edible foundation.
Step 4: Pre-Bake Crust
Pop the crust into the oven and bake for 10 minutes.
Once done, pull it out and let it hang out while you prep the next part.
Step 5: Whip Up Creamy Filling
Grab your mixer and beat cream cheese and sugar until they become silky smooth and completely blended.
Step 6: Add Colorful Touches
Introduce eggs, a splash of pink food coloring, and vanilla extract to the cream cheese mixture.
Beat until everything is harmoniously combined.
Step 7: Fill And Bake
Pour the dreamy cream cheese mixture evenly into the pre-baked crust.
Return to the oven and bake for 30 minutes.
Step 8: Decorate With Chocolate Eggs
Right after pulling the cheesecake from the oven, sprinkle mini chocolate Easter eggs across the top for a festive touch.
Step 9: Chill And Serve
Allow the cheesecake to cool down to room temperature.
Then refrigerate for at least 4 hours, letting the flavors mingle and set.
Slice, serve, and enjoy!
Cheesecake Tips With Mini Egg Mix
Mini Egg Cheesecake Stores Sweet and Smooth
Sweet Toppings For Mini Egg Cheesecake
Baked Mini Egg Easter Cheesecake Riffs
FAQs
Graham cracker crumbs provide a classic, sweet base that perfectly complements the creamy cheesecake filling, while melted butter helps bind the crumbs together for a crisp, delicious texture.
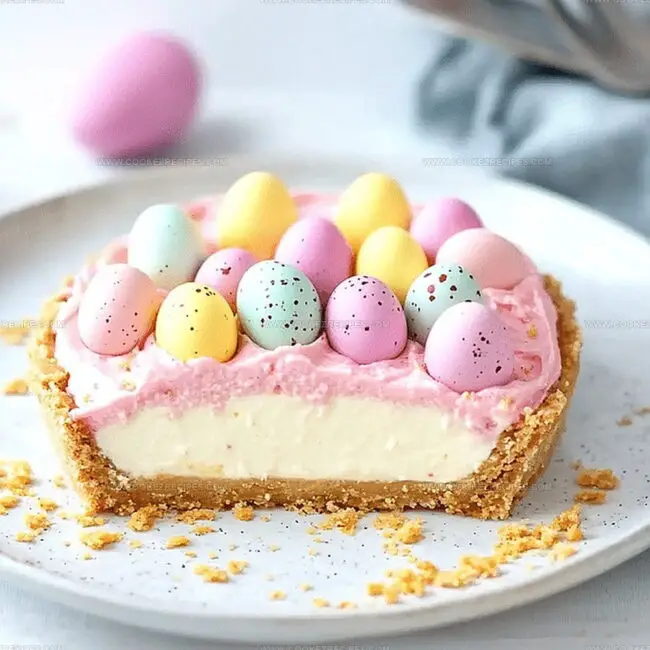
The pink food coloring adds a festive Easter-themed color to the cheesecake, creating a soft, pastel hue that makes the dessert visually appealing and perfect for spring celebrations.
The mini chocolate Easter eggs provide a decorative and delicious touch, adding a chocolate element that contrasts beautifully with the creamy cheesecake and creates a fun, seasonal presentation.
You can experiment with gluten-free graham crackers for the crust and use low-fat cream cheese to make a lighter version of this Easter dessert.
Print
Baked Mini Egg Easter Cheesecake Recipe
- Total Time: 45 minutes
- Yield: 12 1x
Description
Chocolate graham cracker crust cradles creamy mini egg cheesecake, a delightful Easter dessert that melts hearts faster than spring sunshine. Sweet chocolate specks and silky texture make this treat irresistible for anyone craving seasonal indulgence.
Ingredients
Main Ingredients:
- 2 8-ounce (226 grams) packages cream cheese, softened
- 2 eggs, room temperature
- 2 cups mini chocolate Easter eggs
Crust Ingredients:
- 1 1/2 cups graham cracker crumbs
- 1/4 cup powdered sugar
- 4 tablespoons (60 milliliters) butter, melted
Flavor and Decoration Ingredients:
- 2/3 cup sugar
- 1 teaspoon vanilla extract
- Pink food coloring
Instructions
- Craft a buttery graham cracker foundation by combining crumbs, powdered sugar, and melted butter until the mixture coheres.
- Press the crumb mixture firmly into a 9-inch pie pan, ensuring an even layer covers the bottom and sides of the dish.
- Crisp the crust in a preheated 350°F oven for 10 minutes, creating a golden, sturdy base.
- In a separate mixing bowl, whip cream cheese and sugar until achieving a silky, uniform consistency.
- Incorporate eggs, delicate pink food coloring, and vanilla extract, blending thoroughly to create a smooth, pale pink filling.
- Carefully pour the cream cheese mixture into the pre-baked crust, spreading evenly to eliminate any air pockets.
- Return the cheesecake to the oven and bake for approximately 30 minutes, allowing the filling to set with a gentle jiggle in the center.
- Immediately after removing from the oven, artfully arrange mini chocolate Easter eggs across the surface of the warm cheesecake.
- Allow the cheesecake to cool completely at room temperature, then transfer to the refrigerator for a minimum of 4 hours to achieve optimal texture and flavor melding.
- Before serving, gently release the cheesecake from the pan and slice into decadent portions adorned with the charming chocolate eggs.
Notes
- Carefully press the graham cracker crust firmly and evenly to prevent crumbling and ensure a stable base for the cheesecake.
- Room temperature cream cheese helps create a smoother, lump-free filling, so remove it from the refrigerator 30 minutes before mixing.
- To prevent cracking, avoid overmixing the cheesecake batter and bake in a water bath for more even, gentle heat distribution.
- For a gluten-free version, substitute graham cracker crumbs with almond flour or gluten-free cookie crumbs, maintaining the same binding ratio with melted butter.
- Prep Time: 15 minutes
- Cook Time: 30 minutes
- Category: Desserts
- Method: Baking
- Cuisine: American
Nutrition
- Serving Size: 12
- Calories: 230
- Sugar: 18 g
- Sodium: 210 mg
- Fat: 12 g
- Saturated Fat: 7 g
- Unsaturated Fat: 4 g
- Trans Fat: 0 g
- Carbohydrates: 28 g
- Fiber: 1 g
- Protein: 3 g
- Cholesterol: 60 mg
Daniel Bruns
Founder & Culinary Innovator
Expertise
Recipe development for home cooks, Nutritional analysis and meal planning, Culinary education and food writing
Education
Auguste Escoffier School of Culinary Arts
Diploma in Culinary Arts and Operations
Focus: Classical and contemporary cooking techniques, Culinary entrepreneurship and kitchen management, Menu development and food cost analysis
Daniel’s story started with flour on his face and a pie in the oven at his grandma’s house. He later sharpened his skills at the Auguste Escoffier School of Culinary Arts.
His goal? Recipes so simple you’ll want to cook every night. When he’s not whipping up one-pan wonders, Daniel’s outside picking herbs, hosting neighborhood cook-offs, or baking chocolate cakes with his kids, messy, sweet, and unforgettable.