
Crispy Cheese Fingers with Bacon Recipe: A Savory Family Treat
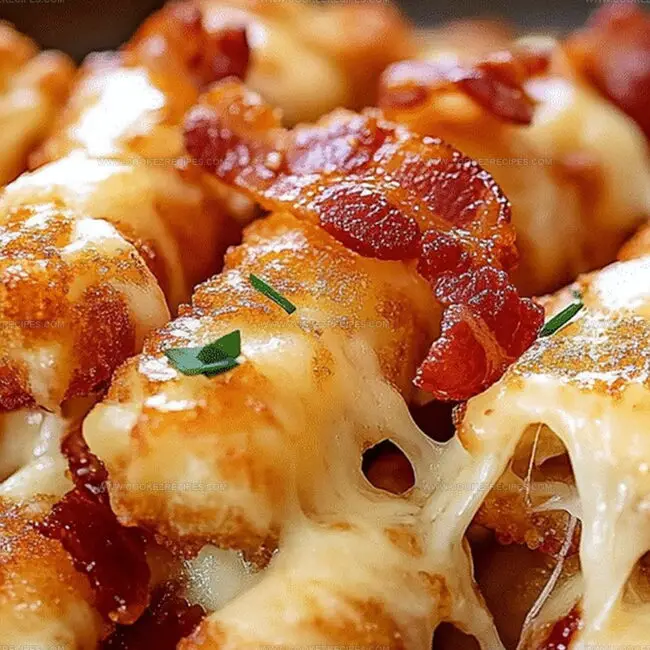
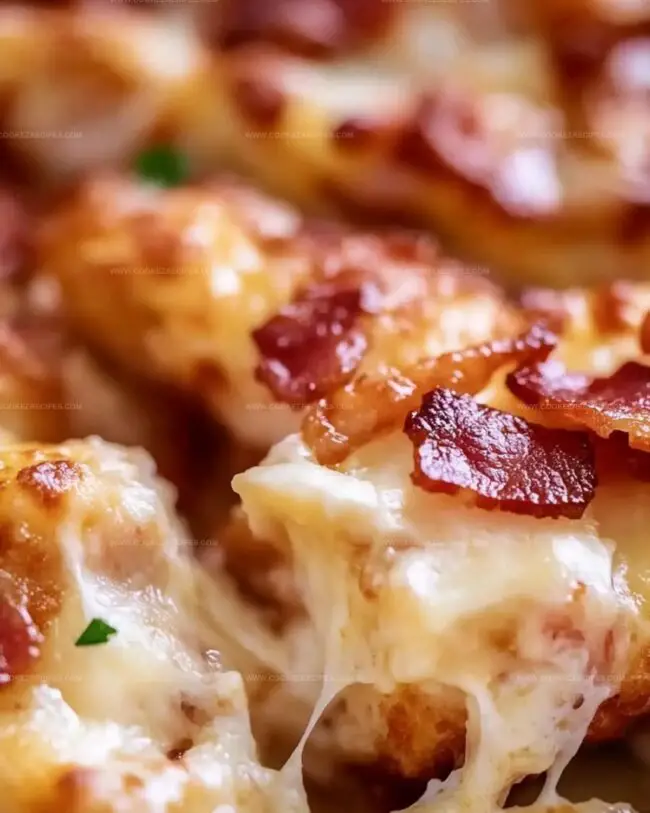
Crispy cheese fingers dance with smoky bacon, creating a tantalizing appetizer that defies ordinary snack expectations.
Savory ingredients intertwine in a playful culinary adventure.
Melted cheese wraps around crisp bacon strips, delivering unexpected flavor bursts.
Each bite promises a perfect balance of crunch and richness.
Kitchen experiments rarely turn out this deliciously surprising.
Bold flavors merge into an irresistible finger food that sparks conversations.
Cheese Fingers With Bacon That Disappear In Minutes
Cheese and Bacon Snack Finger Ingredients
Pastry Base:Main Flavor Ingredients:Finishing and Garnish:Cheese Fingers With Bacon Cooking Process
Step 1: Slice Pastry Strips
Grab your puff pastry and slice it into long, slender strips about 1.5 inches wide.
Make sure your cuts are clean and even for uniform twists.
Step 2: Create Flavor Base
Spread a light, tangy layer of ketchup across each pastry strip.
This will help the toppings stick and add a zesty background flavor.
Step 3: Layer Delicious Toppings
Sprinkle generously with cheese and arrange crispy bacon pieces:Ensure the toppings cover most of the pastry surface for maximum flavor.
Step 4: Craft Elegant Twists
Carefully fold and twist each pastry strip three times, creating a beautiful spiral shape that looks like a gourmet cheese stick.
Gently press the edges to seal the ingredients inside.
Step 5: Prepare for Baking
Brush each twist with egg wash and sprinkle with:These will create a golden, crunchy exterior with extra texture.
Step 6: Bake to Perfection
Place twists on a parchment-lined baking sheet.
Bake in a preheated oven at 350°F for 18-22 minutes until they turn a beautiful golden brown and look irresistibly crispy.
Step 7: Serve and Enjoy
Allow twists to cool for a few minutes.
Serve warm as an appetizer, snack, or party finger food.
They’re perfect for dipping in marinara sauce or enjoying on their own.
Cheese Finger Tips With Bacon Crisp

Cheese Fingers with Bacon: Save and Reheat Easily
Bold Flavors With Cheese Fingers
Crispy Bacon Cheese Finger Options
FAQs
You’ll need puff pastry, ketchup, shredded cheese, bacon, egg yolk, and black cumin or sesame seeds for garnishing.
Absolutely! Cheddar, mozzarella, or a blend of cheeses work great. Choose a cheese that melts well and matches your taste preference.
Yes, cheese fingers are perfect for kids. They’re fun to eat, easy to handle, and have familiar flavors that children typically enjoy.
Don’t add too much ketchup, and make sure to pat bacon dry before placing it on the pastry to reduce excess moisture.
Print
Cheese Fingers with Bacon Recipe
- Total Time: 30 minutes
- Yield: 4 1x
Description
Savory cheese fingers with bacon dance across your plate, bringing irresistible flavor combinations from classic comfort food territories. Crispy bacon embraces melted cheese in a delightful handheld treat you cannot resist.
Ingredients
Main Ingredients:
- 150 grams (5.3 ounces) smoked bacon, sliced
- 50 grams (1.8 ounces) cheese, shredded
- 1/2 sheet puff pastry
Finishing Ingredients:
- 1 egg yolk (for brushing)
- Ketchup (for spreading)
Garnish:
- Black cumin or sesame seeds
Instructions
- Slice the puff pastry into slender, elongated strips approximately 3 centimeters wide, ensuring uniform width for consistent baking.
- Apply a delicate, even layer of ketchup across each pastry strip, creating a zesty flavor foundation.
- Generously distribute shredded cheese over the ketchup, covering the entire surface to ensure a rich, melted coating.
- Carefully arrange bacon slices atop the cheese, positioning them to maximize flavor and coverage.
- Skillfully manipulate each pastry strip, twisting it three complete rotations to craft distinctive “finger-like” shapes with elegant curves.
- Gently coat the pastry surfaces with beaten egg yolk, using a soft brush to create a glossy, golden exterior.
- Sprinkle black cumin or sesame seeds over the prepared pastries, adding a subtle crunch and aromatic dimension.
- Transfer the assembled cheese fingers onto a prepared baking sheet, maintaining slight separation between each piece.
- Position the baking sheet in a preheated oven at 180°C, allowing the pastries to transform into golden, crispy delicacies over approximately 20 minutes.
- Remove from the oven and permit a brief cooling period, allowing the cheese to set and textures to stabilize before serving at a comfortable room temperature.
Notes
- Experiment with different cheese varieties like cheddar, mozzarella, or gouda for unique flavor profiles.
- For a healthier twist, swap bacon with turkey bacon or use vegetarian bacon alternatives to reduce fat content.
- Create gluten-free versions by using gluten-free puff pastry, ensuring those with dietary restrictions can enjoy this tasty snack.
- Enhance the seasoning by adding herbs like thyme, rosemary, or chili flakes to the cheese and bacon layer for extra depth of flavor.
- Prep Time: 10 minutes
- Cook Time: 20 minutes
- Category: Snacks, Appetizer
- Method: Baking
- Cuisine: American
Nutrition
- Serving Size: 4
- Calories: 303
- Sugar: 1g
- Sodium: 620mg
- Fat: 22g
- Saturated Fat: 9g
- Unsaturated Fat: 10g
- Trans Fat: 0g
- Carbohydrates: 20g
- Fiber: 1g
- Protein: 10g
- Cholesterol: 102mg
Daniel Bruns
Founder & Culinary Innovator
Expertise
Recipe development for home cooks, Nutritional analysis and meal planning, Culinary education and food writing
Education
Auguste Escoffier School of Culinary Arts
Diploma in Culinary Arts and Operations
Focus: Classical and contemporary cooking techniques, Culinary entrepreneurship and kitchen management, Menu development and food cost analysis
Daniel’s story started with flour on his face and a pie in the oven at his grandma’s house. He later sharpened his skills at the Auguste Escoffier School of Culinary Arts.
His goal? Recipes so simple you’ll want to cook every night. When he’s not whipping up one-pan wonders, Daniel’s outside picking herbs, hosting neighborhood cook-offs, or baking chocolate cakes with his kids, messy, sweet, and unforgettable.