Homemade Cheesy Pepperoni Rolls Recipe Everyone Will Enjoy
Warm, gooey cheesy pepperoni rolls have become my secret weekend comfort food addiction.
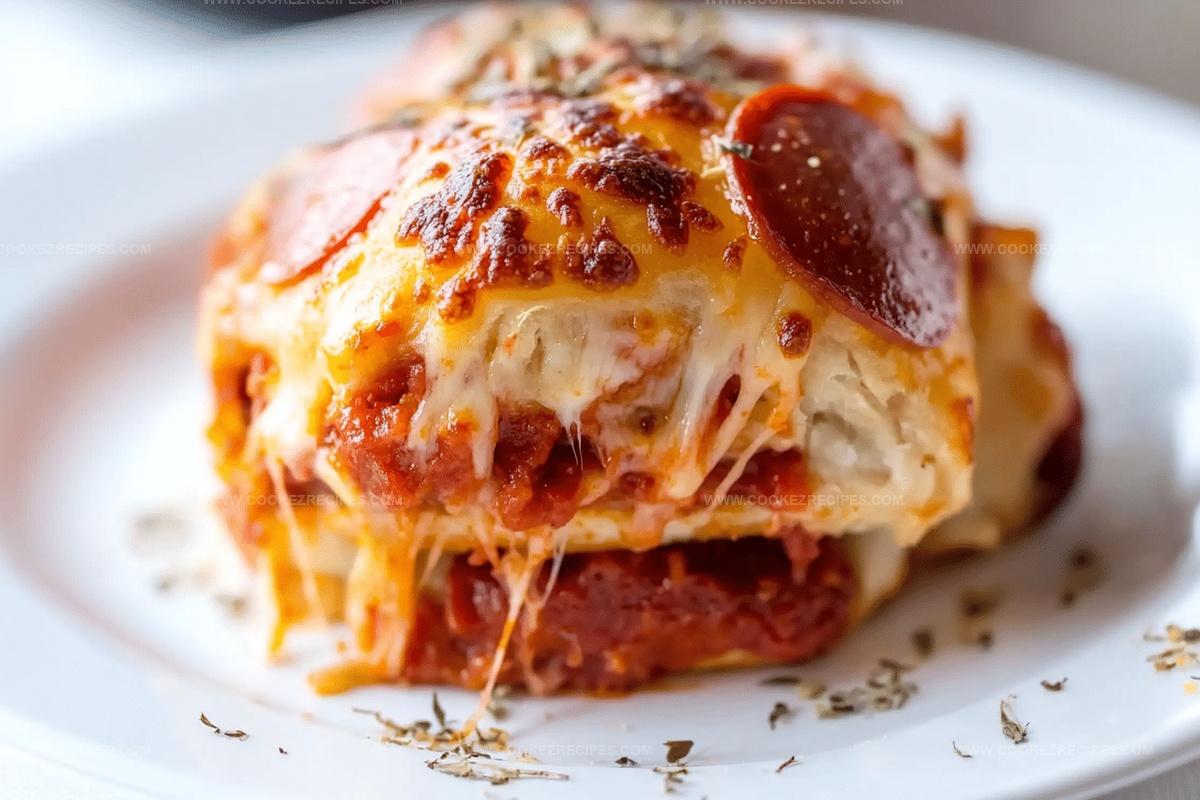
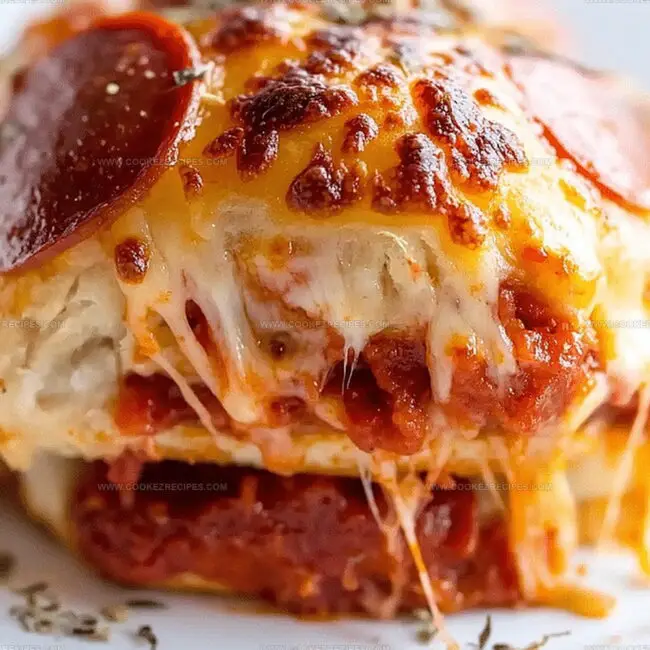
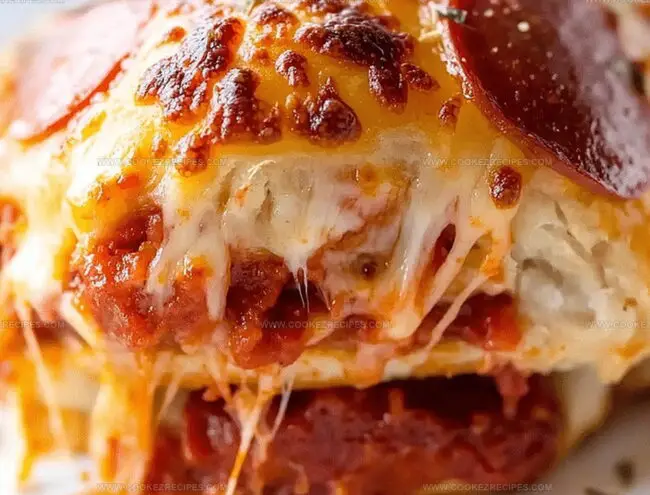
Crispy edges and melted cheese create an irresistible combination that makes mouths water instantly.
Memories of childhood bakeries flood back with each bite of these savory treats.
Regional pizza shop traditions inspired this simple yet delectable recipe that anyone can master at home.
Soft dough wrapped around spicy pepperoni and oozing cheese promises pure satisfaction.
Savory aromas will soon fill your kitchen, tempting everyone nearby.
Let’s unlock the magic of these delightful rolls together and transform an ordinary meal into something extraordinary.
Cheesy Pepperoni Rolls That Disappear Fast
What’s Wrapped in Cheesy Pepperoni Rolls
Main Ingredients:
Dough and Sauce:Filling Ingredients:Seasoning and Finishing Ingredients:Directions for Cheesy Pepperoni Rolls
Step 1: Prepare the Baking Station
Warm up your oven to a toasty 425°F.
Grab a 9×11″ baking pan and give it a quick spray with baking oil to prevent sticking.
Step 2: Create a Saucy Base
Spread a layer of pasta sauce across the bottom of the pan to add extra flavor.
Step 3: Roll and Divide the Dough
On a lightly floured surface, roll out the pizza dough into a nice rectangle.
Slice the dough into 12 equal squares – precision is key!
Step 4: Build Flavor Foundations
For each dough square, add:Step 5: Transform Dough into Pockets
Gather the corners of each dough square and pinch them together tightly.
You’re creating little flavor-packed parcels!
Step 6: Arrange in the Baking Pan
Place the stuffed rolls in the pan with the pinched side facing down.
Tuck halved pepperoni slices between the rolls for extra excitement.
Step 7: Add Final Flavor Touches
Brush the tops of the rolls with olive oil.
Sprinkle with:Step 8: Bake to Golden Perfection
Pop the pan in the oven and bake for 18-20 minutes until the rolls turn a beautiful golden brown.
Step 9: Serve and Enjoy
Serve these hot pockets warm with extra pasta sauce for dipping.
Get ready for a flavor explosion!
Pepperoni Roll Folding Tips
Reheat Cheesy Pepperoni Rolls Without Losing the Melt
Savory Sips With Pepperoni Rolls
Pepperoni Roll Cheese Additions
FAQs
Absolutely! Homemade pizza dough works great and can make the pepperoni rolls even more delicious. Just ensure the dough is rolled out thin and can be easily shaped.
Mozzarella is the top choice for this recipe, but you can also use a blend of mozzarella and parmesan for extra flavor. Shredded cheese melts perfectly and creates that gooey texture.
Pinch the dough corners tightly and make sure they are completely sealed. Place the rolls seam-side down in the baking pan to help maintain their shape during baking.
Yes, you can prepare the rolls and refrigerate them before baking. Just cover the pan with plastic wrap and bake within 24 hours for the best results.
Print
Cheesy Pepperoni Rolls Recipe
- Total Time: 35 minutes
- Yield: 4 1x
Description
Savory West Virginia cheesy pepperoni rolls blend hearty Appalachian comfort with simple, irresistible ingredients. Warm bread hugging spicy pepperoni and melted cheese creates a perfect handheld snack you’ll crave again and again.
Ingredients
Main Ingredients:
- 1 lb pizza dough (homemade or store-bought)
- 3032 pepperoni slices
- 3/4 cup (177 milliliters) shredded mozzarella cheese (or Italian cheese blend)
Sauce and Seasoning:
- 1 cup (237 milliliters) RAGU Homestyle Traditional Pasta Sauce (plus more for dipping)
- 1 teaspoon dried oregano
- 1/4 teaspoon salt
- 1/4 teaspoon black pepper
Cooking Ingredients:
- 2 tablespoons olive oil
Instructions
- Prepare a spacious baking surface by coating a 9×11″ pan with cooking spray, then spread a thin layer of pasta sauce across the bottom.
- Transform pizza dough into a wide, flat rectangle on a flour-dusted workspace, meticulously dividing it into 12 uniform squares.
- Craft individual roll foundations by dolloping pasta sauce at the center of each dough segment.
- Layer two pepperoni slices atop the sauce, creating a savory base for each roll.
- Generously crown the pepperoni with a sprinkle of shredded cheese.
- Gather each dough square’s corners, carefully pressing and sealing them to form compact, enclosed parcels.
- Arrange the rolls in the prepared pan with sealed sides facing downward, creating a snug arrangement.
- Slice remaining pepperoni into halves and nestle them strategically between the rolls for enhanced flavor distribution.
- Enhance the rolls’ exterior by delicately brushing with olive oil, then generously dust with oregano, salt, and freshly ground black pepper.
- Shower the rolls with a final layer of cheese, ensuring complete coverage.
- Position the pan in a preheated 425°F oven, baking until the rolls transform into a golden, appetizing hue (approximately 18-20 minutes).
- Serve immediately alongside additional pasta sauce for an indulgent dipping experience.
Notes
- Prep Ahead: You can assemble these rolls earlier in the day and refrigerate until ready to bake, making meal planning a breeze.
- Dough Flexibility: Use homemade or store-bought pizza dough; gluten-free options work perfectly for those with dietary restrictions.
- Cheese Variations: Experiment with different cheese types like mozzarella, provolone, or a blend to customize flavor profiles and textures.
- Vegetarian Twist: Replace pepperoni with roasted vegetables like bell peppers, mushrooms, or zucchini for a meat-free alternative that’s equally delicious.
- Prep Time: 15 minutes
- Cook Time: 20 minutes
- Category: Snacks, Appetizer, Lunch, Dinner
- Method: Baking
- Cuisine: Italian
Nutrition
- Serving Size: 4
- Calories: 400
- Sugar: 3 g
- Sodium: 800 mg
- Fat: 22 g
- Saturated Fat: 8 g
- Unsaturated Fat: 12 g
- Trans Fat: 0 g
- Carbohydrates: 40 g
- Fiber: 2 g
- Protein: 15 g
- Cholesterol: 30 mg
Daniel Bruns
Founder & Culinary Innovator
Expertise
Recipe development for home cooks, Nutritional analysis and meal planning, Culinary education and food writing
Education
Auguste Escoffier School of Culinary Arts
Diploma in Culinary Arts and Operations
Focus: Classical and contemporary cooking techniques, Culinary entrepreneurship and kitchen management, Menu development and food cost analysis
Daniel’s story started with flour on his face and a pie in the oven at his grandma’s house. He later sharpened his skills at the Auguste Escoffier School of Culinary Arts.
His goal? Recipes so simple you’ll want to cook every night. When he’s not whipping up one-pan wonders, Daniel’s outside picking herbs, hosting neighborhood cook-offs, or baking chocolate cakes with his kids, messy, sweet, and unforgettable.