
Whip Up a Playful Chocolate Easter Nest Cake Recipe Today
Crafting a delightful chocolate easter nest cake brings pure joy to any festive celebration.
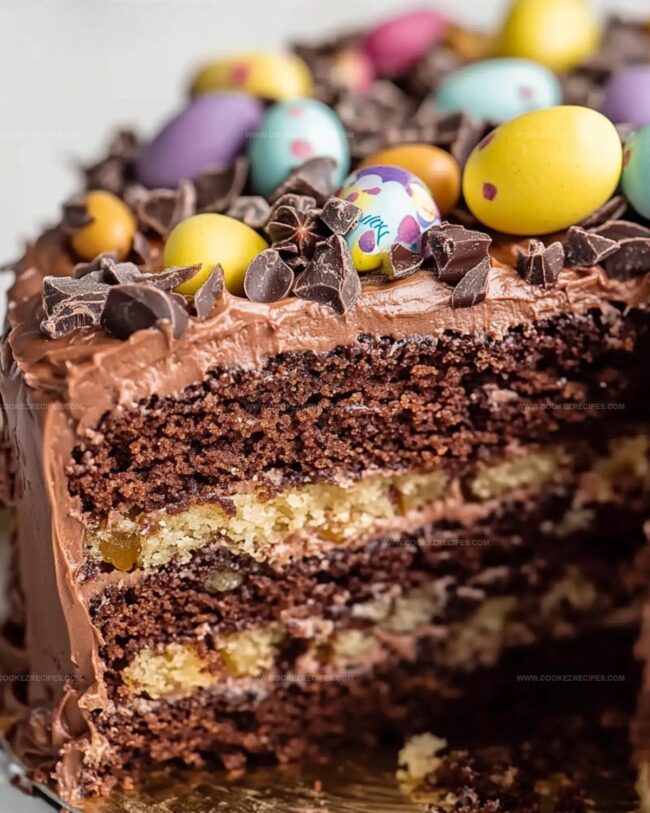
Sweet chocolate crumbles mingle with delicate marshmallow strands, creating a whimsical dessert.
Springtime calls for playful treats that spark excitement around the table.
Fluffy layers of rich cocoa promise a decadent experience for chocolate enthusiasts.
Colorful candy eggs nestled atop the cake add a cheerful touch of whimsy.
Minimal kitchen skills guarantee success with this simple yet impressive confection.
Let your baking adventure begin and delight everyone with this charming seasonal masterpiece.
Chocolate Nest Cake That’s A Spring Showstopper

Chocolate Easter Nest Cake Elements
Cake Base:Wet Ingredients:Sweeteners and Enhancers:Buttercream:Decoration:Chocolate Easter Nest Cake Recipe – Baking and Decorating Guide
Step 1: Whip Up the Chocolate Cake Base
Crank your oven to a cozy 350°F.
Grab two cake pans and give them a quick spray and parchment paper hug.
In one bowl, combine your dry ingredients:In another bowl, gather your wet ingredients:Gently marry the wet and dry ingredients until just combined.
Pour in some boiling water to create a silky smooth batter.
Divide the mixture between your pans and bake for 30 minutes.
You’ll know it’s ready when a toothpick comes out clean.
Let the cakes cool completely on a wire rack.
Step 2: Craft Decadent Chocolate Buttercream
Fire up your stand mixer and beat the butter until it transforms into a creamy dream.
Dust in cocoa powder and mix thoroughly.
Gradually rain in powdered sugar, creating a luscious frosting.
Splash in milk and vanilla, whipping until everything looks smooth and irresistible.
Step 3: Transform Coconut Into Golden Treasure
Toast your coconut in a dry pan over medium heat, stirring constantly.
Watch it turn a beautiful golden brown.
Alternatively, spread it on a baking sheet and pop into the oven at 320°F for about 5 minutes.
Step 4: Build Your Spectacular Nest Cake
Spread a generous layer of buttercream between your cake layers.
Give the entire cake a thin crumb coat and chill for 20 minutes.
Frost the cake completely with remaining buttercream.
Nestle Cadbury mini eggs in the center.
Press toasted coconut around the sides and top, creating a magical nest-like appearance.
Nest Cake Tips With Chocolate Crunch

Easter Nest Cake Reheats Light and Fluffy
Rich Matches For Nest Cake
Chocolate Easter Nest Cake Recipe Styles
FAQs
The cake’s deep chocolate flavor comes from cocoa powder mixed directly into the batter and the chocolate buttercream frosting, which uses additional cocoa powder for intense richness.
Yes, you can use a hand mixer or even mix by hand with a whisk. The key is to mix ingredients until just combined without overmixing the batter.
Boiling water helps activate the cocoa powder, creating a more intense chocolate flavor and making the cake batter smoother and more liquid.
Absolutely! The recipe has clear step-by-step instructions and uses simple techniques like whisking, mixing, and spreading frosting, making it perfect for home bakers of all skill levels.
Print
Chocolate Easter Nest Cake Recipe
- Total Time: 1 hour
- Yield: 12 1x
Description
Chocolate Easter nest cake brings springtime cheer with delightful layers of rich chocolate and playful nest decorations. Sweet chocolate crumb and delicate chocolate ganache create a festive centerpiece perfect for holiday celebrations.
Ingredients
Chocolate Cake Dry Ingredients:
- 2 cups (400g) granulated sugar
- 1 3/4 cups (210g) all-purpose flour
- 3/4 cup (75g) unsweetened cocoa powder
- 1 1/2 teaspoons baking powder
- 1 1/2 teaspoons baking soda
- 1 teaspoon salt
- 1 teaspoon espresso powder (optional)
Chocolate Cake Wet Ingredients:
- 2 large eggs (2 ounces each)
- 1 cup (240 milliliters) buttermilk or milk
- 1/2 cup (120 milliliters) vegetable or canola oil
- 2 teaspoons (10 milliliters) pure vanilla extract
- 1 cup (240 milliliters) boiling water
Chocolate Buttercream and Decorations:
- 1/2 cup (113 grams) unsalted butter, softened
- 3/4 cup (75 grams) cocoa powder
- 3 cups (360 grams) powdered sugar
- 3 tablespoons (45 milliliters) milk (more if needed)
- 1 teaspoon (5 milliliters) pure vanilla extract
- 80 grams Cadbury mini eggs
- 75 grams shredded coconut
Instructions
- Craft the cake foundation by sifting dry ingredients together, ensuring a smooth, lump-free mixture of flour, cocoa, leavening agents, and sugar.
- Whisk liquid components separately, blending eggs, buttermilk, oil, and vanilla until uniformly incorporated.
- Gently fold wet and dry mixtures, stirring minimally to maintain a tender texture.
- Introduce boiling water to thin the batter, creating a silky, pourable consistency.
- Distribute the mixture evenly between prepared cake pans, tapping to release potential air bubbles.
- Bake in a preheated oven until a testing skewer emerges clean, indicating perfect doneness.
- Allow cakes to rest briefly in pans before transferring to a cooling rack, preventing potential moisture retention.
- Whip butter until luxuriously creamy, developing a light and airy base for the frosting.
- Incorporate cocoa powder, creating a rich, deep chocolate foundation.
- Gradually integrate powdered sugar, beating thoroughly to achieve a smooth, spreadable consistency.
- Enhance the frosting with milk and vanilla, blending until glossy and uniform.
- Transform coconut into a golden, fragrant topping using gentle stovetop or oven techniques.
- Sandwich cake layers with a generous chocolate buttercream filling.
- Apply a delicate crumb coat, chilling to set the initial frosting layer.
- Enrobe the entire cake with remaining buttercream, creating a smooth finish.
- Artfully arrange Cadbury mini eggs as decorative centerpiece elements.
- Sprinkle toasted coconut around the cake, mimicking a rustic nest-like appearance.
Notes
- Customize the cake’s chocolate intensity by adjusting the cocoa powder quantity for deeper or lighter chocolate flavor.
- Swap buttermilk with yogurt or plant-based milk alternatives to accommodate dairy-free dietary needs.
- Use gluten-free flour blend to transform this recipe into a celiac-friendly dessert without compromising taste.
- Control coconut toasting carefully to prevent burning, stirring frequently and watching closely to achieve golden-brown color.
- Prep Time: 10 minutes
- Cook Time: 50 minutes
- Category: Desserts, Snacks
- Method: Baking
- Cuisine: British
Nutrition
- Serving Size: 12
- Calories: 350
- Sugar: 40g
- Sodium: 250mg
- Fat: 18g
- Saturated Fat: 8g
- Unsaturated Fat: 10g
- Trans Fat: 0g
- Carbohydrates: 50g
- Fiber: 2g
- Protein: 4g
- Cholesterol: 50mg
Daniel Bruns
Founder & Culinary Innovator
Expertise
Recipe development for home cooks, Nutritional analysis and meal planning, Culinary education and food writing
Education
Auguste Escoffier School of Culinary Arts
Diploma in Culinary Arts and Operations
Focus: Classical and contemporary cooking techniques, Culinary entrepreneurship and kitchen management, Menu development and food cost analysis
Daniel’s story started with flour on his face and a pie in the oven at his grandma’s house. He later sharpened his skills at the Auguste Escoffier School of Culinary Arts.
His goal? Recipes so simple you’ll want to cook every night. When he’s not whipping up one-pan wonders, Daniel’s outside picking herbs, hosting neighborhood cook-offs, or baking chocolate cakes with his kids, messy, sweet, and unforgettable.