Crispy Baked Dry Rub Wings Recipe: Flavor-Packed Crowd Pleaser
Crispy baked dry rub wings can revolutionize your weekend snack game with minimal effort and maximum flavor.
Spices dance across perfectly cooked chicken, creating a mouthwatering experience that beats takeout every single time.
Home cooks rarely understand how simple these wings become with just a few strategic techniques.
Marinades might seem complicated, but this method strips away unnecessary steps for pure, intense deliciousness.
Salt, pepper, and specialized spice blends work magic on tender meat surfaces.
Forget complicated recipes that require hours of preparation.
Jump into this straightforward approach that guarantees restaurant-quality wings right from your own kitchen.
Crispy Baked Dry Rub Wings With Big Flavor
Spice Rub and Wings Mix for Crispy Baked Dry Rub Wings
Proteins:Dry Seasonings:Binding and Crisping Agents:Optional Serving Accompaniments:How to Cook Crispy Dry Rub Wings
Step 1: Prepare the Oven
Heat the oven to 425°F and line a baking sheet with parchment paper.
This ensures even cooking and prevents the wings from sticking.
Step 2: Dry the Chicken Wings
Grab paper towels and thoroughly pat the chicken wings until completely dry.
Removing excess moisture is crucial for achieving that amazing crispy texture.
Step 3: Create the Flavor Coating
In a large mixing bowl, combine the wings with:Toss the wings until every piece is evenly and generously coated with the seasoning mixture.
Step 4: Arrange and Bake
Spread the wings in a single layer on the prepared baking sheet.
Make sure they’re not touching each other.
Slide the sheet into the preheated oven and bake for 40-45 minutes.
Flip the wings halfway through cooking to ensure both sides become golden and crispy.
Step 5: Plate and Enjoy
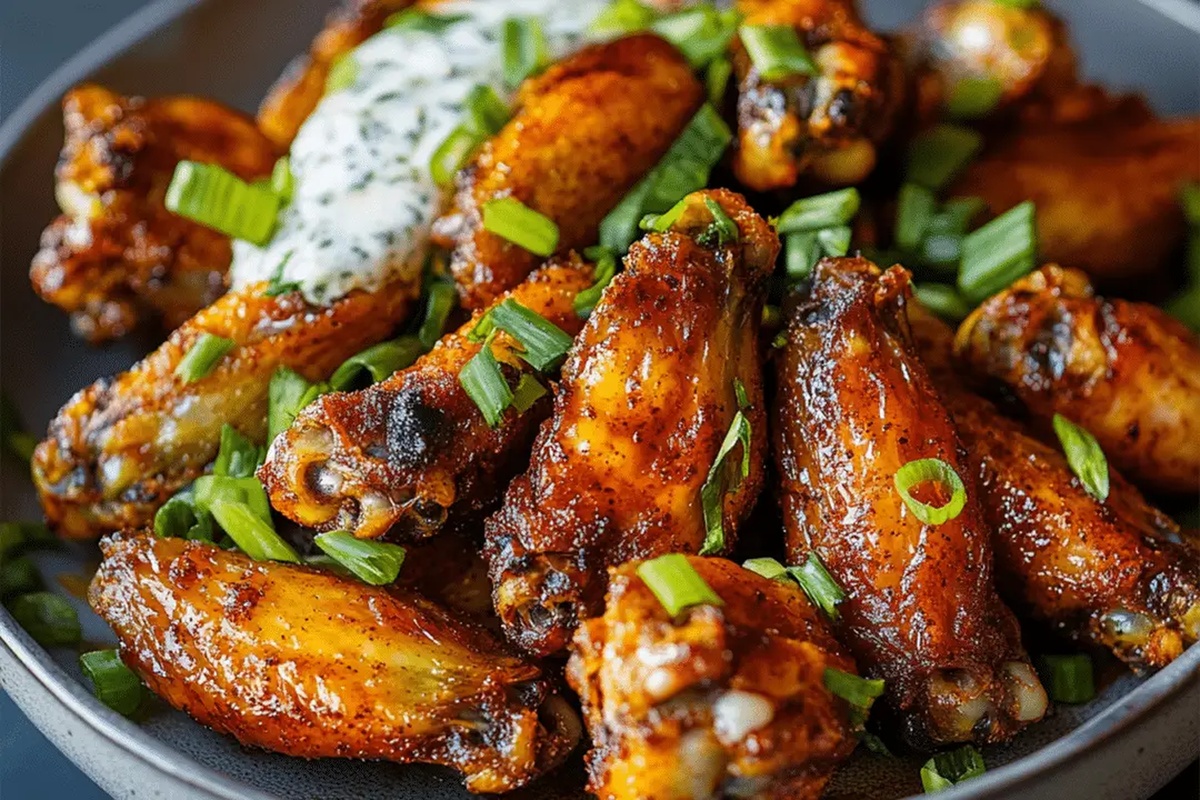
Transfer the wings to a serving platter.
Serve alongside fresh celery sticks, crunchy carrot sticks, and cool blue cheese dressing for dipping.
These wings are perfect for game day, movie night, or anytime you’re craving something deliciously crunchy.
Dry Rub Wing Tips That Stay Crispy
Crispy Wings That Stay Bold With Reheating
Crisp Sides For Dry Rub Wings
Perfect Flavor Boosters for Crispy Dry Rub Wings:Dry Rub Wing Styles
FAQs
Baking powder helps create extra crispy skin by breaking down proteins and drawing moisture to the surface, resulting in a crunchier texture without deep-frying.
Yes, you can substitute avocado oil with olive oil or vegetable oil, though avocado oil has a higher smoke point and provides a clean, neutral flavor for baking wings.
Use a meat thermometer to check that the internal temperature reaches 165°F (74°C) at the thickest part of the wing to ensure they are safely cooked through.
For maximum crispiness, place the seasoned wings on a wire rack over the baking sheet to allow air circulation, which helps moisture evaporate and creates an even crunchier exterior.
Print
Crispy Baked Dry Rub Wings Recipe
- Total Time: 1 hour
- Yield: 4 1x
Description
Crispy baked dry rub wings deliver a perfect balance of bold spices and irresistible crunch straight from your kitchen. Packed with robust flavors and golden-brown edges, these wings promise a mouthwatering experience you’ll crave again and again.
Ingredients
Protein:
- 2 pounds (0.9 kilograms) split chicken wings
Seasoning:
- 1 tablespoon (15 milliliters) avocado oil
- 1 tablespoon (15 grams) baking powder
- 1 batch dry rub for chicken wings
Garnish and Sides:
- Thinly sliced chives, for serving
- Celery and carrots, for serving
- Homemade blue cheese dressing, for serving
Instructions
- Prepare the wing canvas by gently blotting chicken pieces with clean kitchen towels to eliminate excess moisture, ensuring maximum crispiness.
- Create a flavor enhancement mixture combining avocado oil, baking powder, and seasonings in a spacious mixing vessel.
- Delicately tumble chicken segments within the seasoning blend, meticulously coating each piece to guarantee uniform flavor distribution.
- Strategically arrange wing portions across a parchment-lined baking surface, maintaining strategic spacing between pieces to promote ideal air circulation.
- Position the prepared wing array into a preheated thermal environment calibrated to 425°F, allowing precise culinary transformation.
- Execute a midpoint rotation approximately 20-25 minutes into cooking process to guarantee balanced caramelization and consistent texture development.
- Monitor wing progression, watching for a golden-amber exterior and crisp skin indication of complete thermal preparation.
- Extract wings once achieving desired burnished appearance, typically requiring 40-45 minutes total cooking duration.
- Allow brief resting interval to stabilize internal temperature and solidify exterior crispness.
- Present alongside traditional accompaniments like crisp vegetable sticks and tangy blue cheese dressing for complementary flavor experience.
Notes
- Ensure wings are completely dry before seasoning to achieve maximum crispiness and prevent steaming.
- Baking powder acts as a secret weapon, helping break down protein and create that irresistible crispy exterior without deep frying.
- Use a wire rack on the baking sheet for even more crunch, allowing air circulation around the wings during cooking.
- Customize dry rub with different spice blends like Cajun, BBQ, or Mediterranean to keep the recipe exciting and match various flavor preferences.
- Prep Time: 15 minutes
- Cook Time: 45 minutes
- Category: Lunch, Dinner, Appetizer, Snacks
- Method: Baking
- Cuisine: American
Nutrition
- Serving Size: 4
- Calories: 350
- Sugar: 0 g
- Sodium: 800 mg
- Fat: 22 g
- Saturated Fat: 4 g
- Unsaturated Fat: 16 g
- Trans Fat: 0 g
- Carbohydrates: 2 g
- Fiber: 0 g
- Protein: 30 g
- Cholesterol: 100 mg
Daniel Bruns
Founder & Culinary Innovator
Expertise
Recipe development for home cooks, Nutritional analysis and meal planning, Culinary education and food writing
Education
Auguste Escoffier School of Culinary Arts
Diploma in Culinary Arts and Operations
Focus: Classical and contemporary cooking techniques, Culinary entrepreneurship and kitchen management, Menu development and food cost analysis
Daniel’s story started with flour on his face and a pie in the oven at his grandma’s house. He later sharpened his skills at the Auguste Escoffier School of Culinary Arts.
His goal? Recipes so simple you’ll want to cook every night. When he’s not whipping up one-pan wonders, Daniel’s outside picking herbs, hosting neighborhood cook-offs, or baking chocolate cakes with his kids, messy, sweet, and unforgettable.