Sizzling Crunchy Cheesy Chicken Sheet Pan Quesadillas Recipe
Mexican nights just got way more exciting with these irresistible cheesy chicken sheet pan quesadillas that promise maximum flavor with minimal effort.
Crispy edges will have everyone hovering around the kitchen, eagerly waiting for the first slice.
Weeknight dinners rarely come this simple and delicious.
Melted cheese, tender chicken, and golden tortillas create a magical combination you can’t resist.
Simple ingredients transform into a crowd-pleasing meal that takes less than 30 minutes to prepare.
Layers of savory goodness await you in this no-fuss recipe that guarantees smiles around the table.
Get ready to become the dinner hero tonight!
Cheesy Chicken Sheet Pan Quesadillas That Feed A Crowd
Sheet Pan Layers in Cheesy Chicken Quesadillas
Protein Base:Optional Filling Enhancements:Tortilla and Coating:Seasoning:Optional Serving Toppings:Sheet Pan Quesadillas (Cheesy Chicken) Instructions
Step 1: Whip Up Flavor-Packed Chicken Mixture
Grab a big mixing bowl and toss in the ingredients for an epic chicken filling:Mix everything together until the ingredients become best friends and create a mouthwatering blend.
Step 2: Create Quesadilla Magic
Spread out your tortillas on a clean work surface.
Scoop a generous helping of the chicken mixture onto one half of each tortilla, leaving a small border around the edges.
Fold the tortilla over like a cozy blanket, creating perfect half-moon shapes.
Step 3: Prepare Your Baking Canvas
Grab a baking sheet and give it some love with a brush of melted butter or olive oil.
This ensures your quesadillas won’t stick and get that gorgeous golden crispiness.
Step 4: Arrange and Glisten
Carefully place your quesadilla parcels on the prepared baking sheet.
Make sure they’re not overcrowding – give them some breathing room.
Brush the tops with more melted butter or olive oil to create a glistening, crispy exterior.
Step 5: Bake to Crispy Perfection
Slide the baking sheet into a preheated oven at 400°F.
Bake for 10-12 minutes on each side, flipping carefully midway.
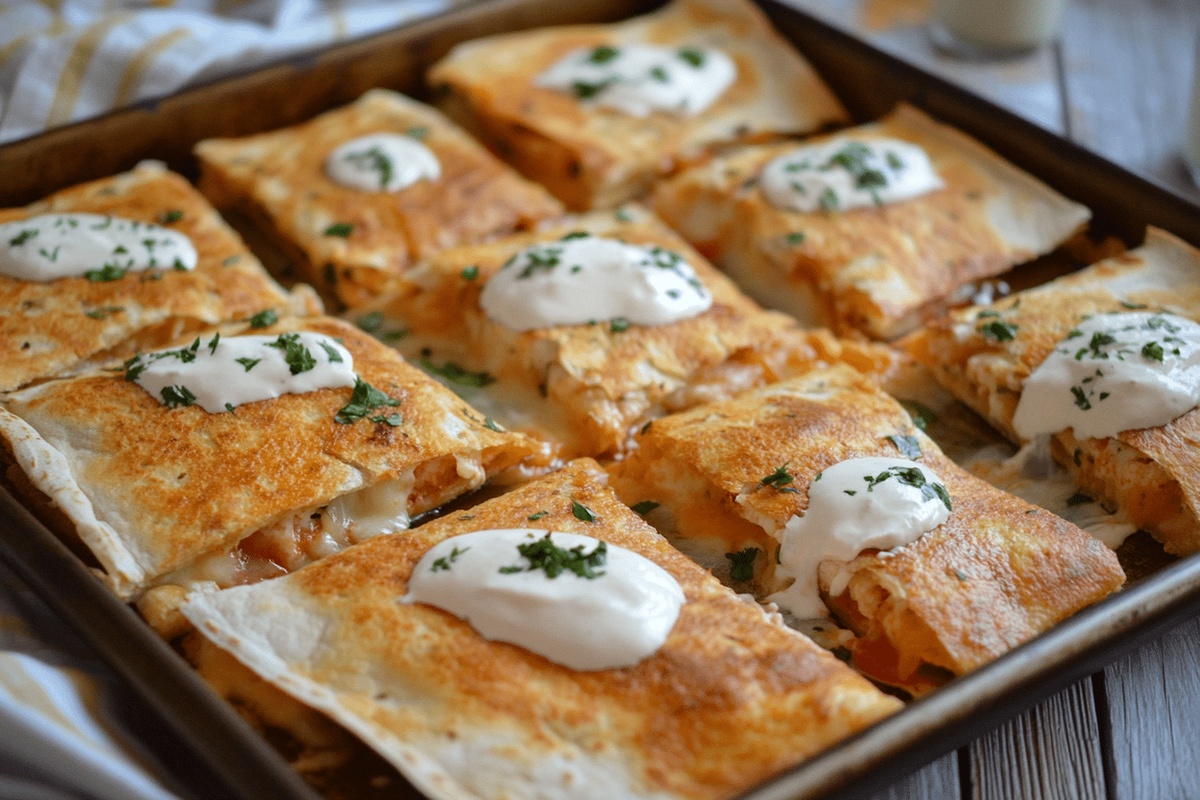
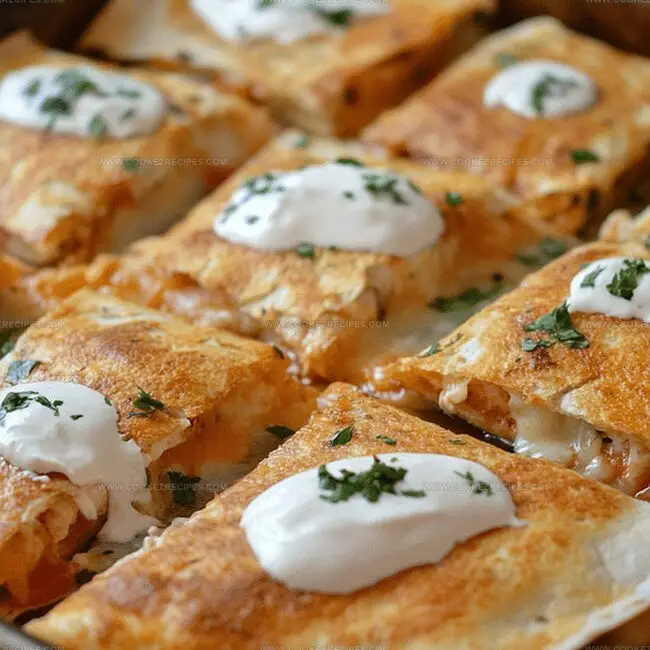
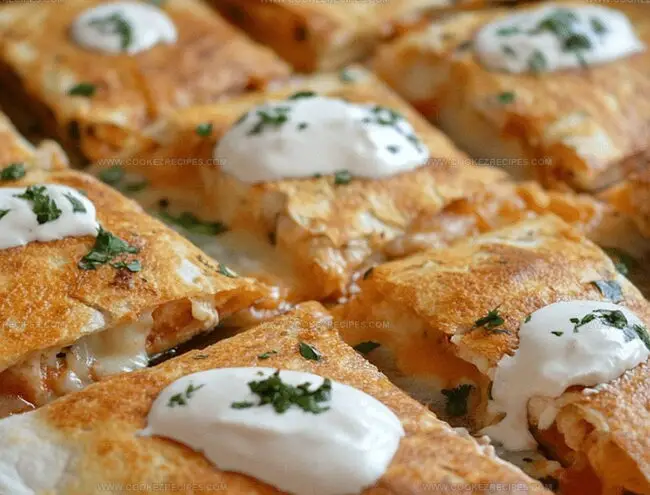
You’re looking for a golden-brown crunch and melted cheese that makes your taste buds dance.
Step 6: Serve and Celebrate
Let the quesadillas cool for a moment (patience is key).
Slice into wedges and arrange on a serving platter.
Unleash a parade of toppings like:Dive in and enjoy your crispy, cheesy creation!
Sheet Pan Quesadilla Crisping Tips
Sheet Pan Quesadillas That Crisp Back Fast
Easy Sips For Chicken Quesadillas
Savor Southwestern Beverage Bliss: Perfect Pairings for Crunchy Cheesy Chicken Quesadillas
Chicken Quesadilla Sheet Pan Ideas
FAQs
The combination of baking tortillas with melted butter or olive oil creates a crispy exterior, while the golden-brown method ensures a satisfying crunch in every bite.
Absolutely! Shredded beef, pulled pork, or even ground turkey work perfectly as alternatives to chicken, maintaining the same delicious flavor profile.
Use whole wheat tortillas, add more vegetables like bell peppers or spinach to the filling, and opt for low-fat cheese to boost nutritional value without compromising taste.
Yes! You can prepare the chicken filling in advance and assemble quesadillas quickly. They also reheat well in an oven or air fryer, making them perfect for quick meals during busy weeks.
Print
Crunchy Cheesy Chicken Sheet Pan Quesadillas Recipe
- Total Time: 50 minutes
- Yield: 6 1x
Description
Sizzling Mexican magic happens when crispy “cheesy chicken sheet pan quesadillas” emerge from your kitchen, packed with zesty flavors and irresistible textures. Quick weeknight dinners welcome this crowd-pleasing dish that delivers bold southwestern comfort on a single pan.
Ingredients
Main Proteins:
- 1 lb (454 g) chicken, cooked and shredded
- 1 cup shredded cheddar cheese
Vegetables and Beans:
- 1/2 cup black beans, rinsed and drained
- 1/4 cup corn kernels
- 1/4 cup salsa or pico de gallo
Seasonings and Extras:
- 1 tablespoon taco seasoning
- 10 large flour tortillas
- 1/4 cup melted butter or olive oil
Toppings:
- Sour cream or Greek yogurt
- Chopped cilantro or green onions
- Salsa or hot sauce
Instructions
- Craft a flavorful chicken mixture by thoroughly blending shredded chicken, melted cheese, hearty black beans, sweet corn kernels, zesty salsa, and aromatic taco seasoning in a spacious mixing bowl.
- Position a tortilla on a clean workspace and generously distribute the prepared chicken medley across one half, ensuring a small perimeter remains uncovered.
- Gently fold the unadorned tortilla section over the filling, creating a perfect crescent-shaped pocket.
- Replicate the folding process with remaining tortillas until all filling is utilized.
- Meticulously coat a large sheet pan with a thin layer of melted butter or olive oil to prevent sticking and enhance golden crispiness.
- Arrange the folded quesadillas in a single, organized layer across the prepared pan, avoiding overcrowding.
- Delicately brush the exterior of each quesadilla with additional butter or oil to promote even browning and enhance flavor profile.
- Slide the pan into a preheated oven set at 400°F, allowing the quesadillas to transform into crispy, golden delights for approximately 10-12 minutes.
- Carefully flip each quesadilla midway through cooking to ensure uniform crunchiness and complete cheese melting.
- Remove from oven and permit a brief cooling period before slicing into wedge-shaped portions.
- Garnish with optional accompaniments like tangy sour cream, fresh cilantro, vibrant salsa, or fiery hot sauce for an enhanced culinary experience.
Notes
- Customize protein by swapping chicken with ground beef, turkey, or plant-based alternatives for varied dietary needs.
- Prevent soggy tortillas by patting chicken dry and using minimal salsa during filling preparation.
- Enhance crispiness by using a preheated baking sheet and avoiding overcrowding during baking.
- Boost nutrition by incorporating extra vegetables like bell peppers, spinach, or zucchini into the filling mixture.
- Prep Time: 20 minutes
- Cook Time: 25-30 minutes
- Category: Lunch, Dinner, Snacks
- Method: Baking
- Cuisine: Mexican
Nutrition
- Serving Size: 6
- Calories: 450
- Sugar: 2 g
- Sodium: 800 mg
- Fat: 20 g
- Saturated Fat: 10 g
- Unsaturated Fat: 8 g
- Trans Fat: 0 g
- Carbohydrates: 45 g
- Fiber: 4 g
- Protein: 25 g
- Cholesterol: 75 mg
Daniel Bruns
Founder & Culinary Innovator
Expertise
Recipe development for home cooks, Nutritional analysis and meal planning, Culinary education and food writing
Education
Auguste Escoffier School of Culinary Arts
Diploma in Culinary Arts and Operations
Focus: Classical and contemporary cooking techniques, Culinary entrepreneurship and kitchen management, Menu development and food cost analysis
Daniel’s story started with flour on his face and a pie in the oven at his grandma’s house. He later sharpened his skills at the Auguste Escoffier School of Culinary Arts.
His goal? Recipes so simple you’ll want to cook every night. When he’s not whipping up one-pan wonders, Daniel’s outside picking herbs, hosting neighborhood cook-offs, or baking chocolate cakes with his kids, messy, sweet, and unforgettable.