No Bake Mini Cheesecakes Recipe for Easter Celebrations
These delectable easter no bake mini cheesecakes promise a sweet escape from traditional baking hassles.
Creamy textures melt softly on your tongue with minimal kitchen effort.
Pastel decorations make each bite a festive celebration of spring’s arrival.
Smooth cream cheese blends perfectly with delicate graham cracker bases.
Whipped toppings add a cloud-like elegance that feels indulgent yet light.
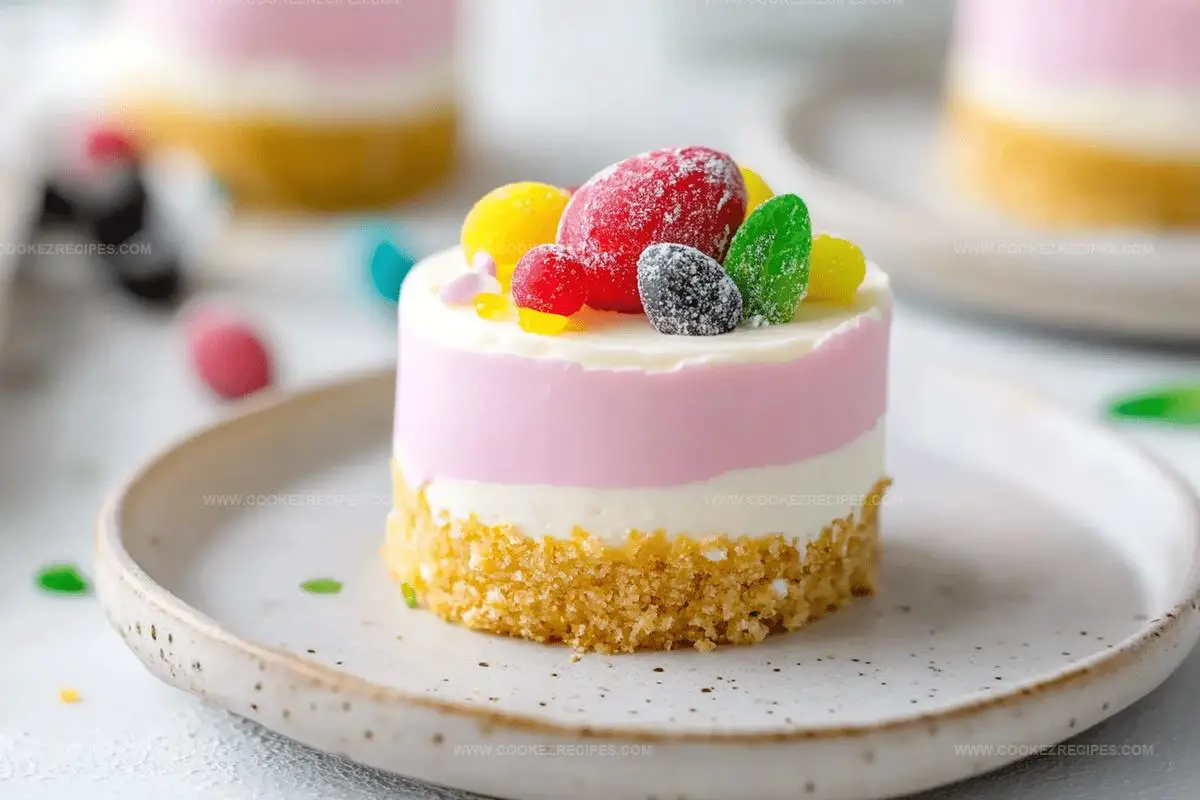
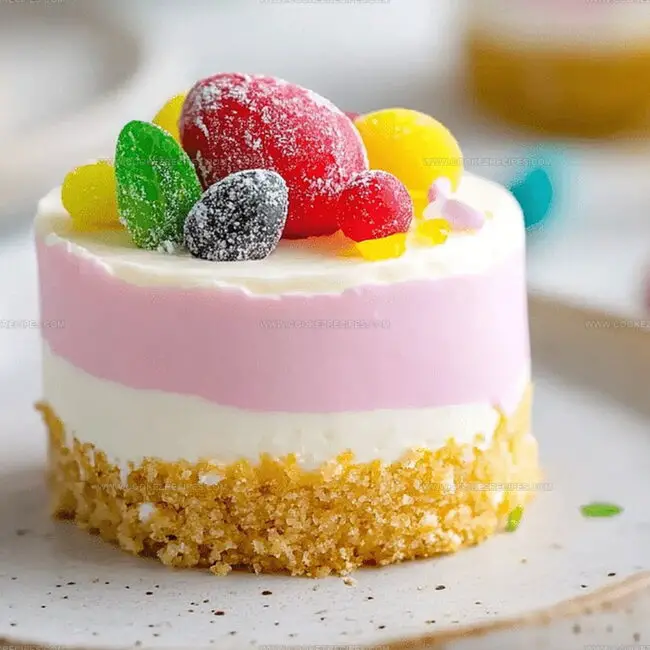
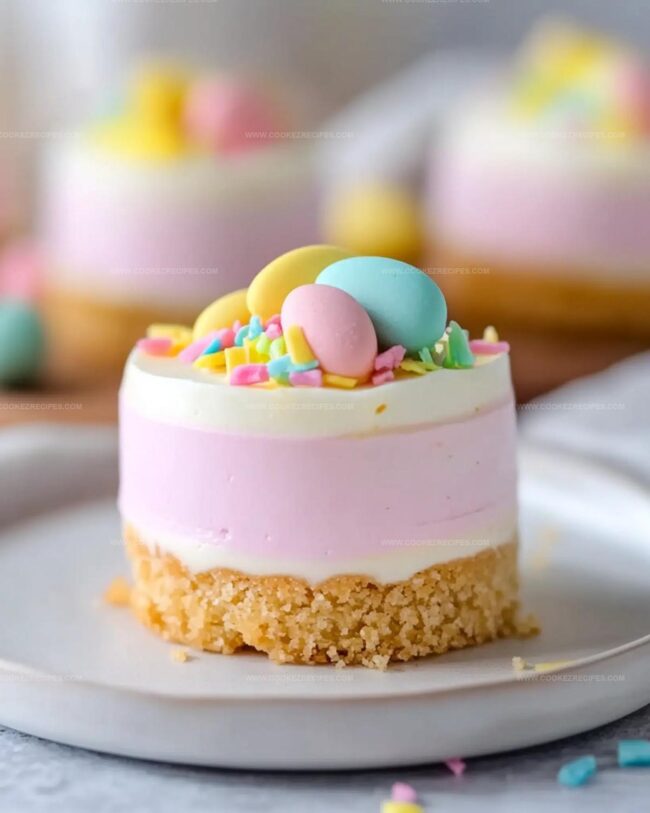
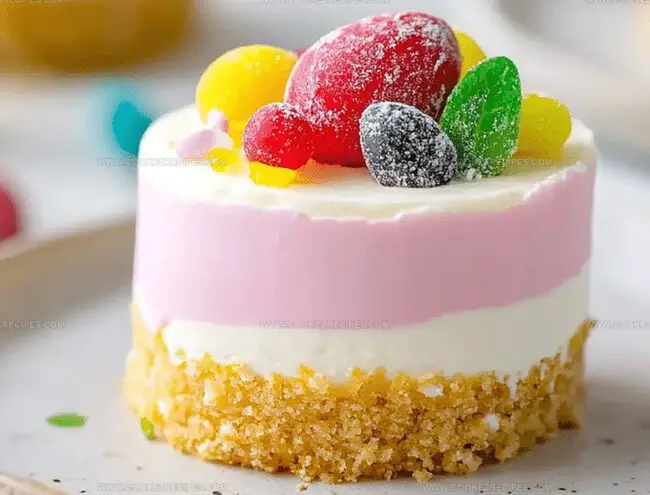
Colorful sprinkles and chocolate eggs create playful visual surprises across these petite desserts.
Quick assembly means you can whip up these charming treats in minutes.
Dive into a world of effortless Easter dessert magic that will delight everyone at your gathering.
No Bake Mini Cheesecakes That Feel Just Right For Spring
What Layers Into Mini Cheesecakes (No Bake)
Dairy Base:Sweeteners and Flavor:Crust and Decoration:Easter No Bake Mini Cheesecakes – Simple Assembly Instructions
Step 1: Whip The Heavy Cream
Beat the heavy whipping cream using an electric mixer until stiff peaks form, creating a fluffy and stable base for your cheesecake.
Step 2: Blend Cream Cheese Mixture
In a separate bowl, mix cream cheese, granulated sugar, sour cream, and vanilla extract until the mixture becomes smooth and creamy.
Step 3: Combine Cream Mixtures
Gently fold the whipped cream into the cream cheese mixture, ensuring a light and airy texture without deflating the whipped cream.
Step 4: Create Colorful Batters
Divide the batter into four separate bowls and add different food coloring to each, creating a vibrant rainbow effect.
Step 5: Prepare Piping Bags
Transfer each colored batter into individual Ziploc bags, cutting a small corner to create a piping tool for easy decoration.
Step 6: Layer Colorful Cheesecake
Pipe one color into silicone molds, gently tapping the mold on the counter to level the batter and remove air bubbles.
Step 7: Complete Color Layers
Continue piping different colors into the molds, filling them almost to the top to create a multicolored effect.
Step 8: Prepare Graham Cracker Base
Melt butter in a microwave-safe bowl, then combine with graham cracker crumbs and sugar to create a crunchy base.
Step 9: Add Cracker Topping
Spoon the graham cracker mixture on top of each cheesecake, gently pressing it into the batter for a solid foundation.
Step 10: Freeze And Set
Place the molds on a tray and freeze for 2-4 hours, allowing the cheesecakes to firm up completely.
Step 11: Unmold And Decorate
Remove the cheesecakes from the molds, then garnish with whipped cream, colorful sprinkles, and festive candy.
Step 12: Serve And Enjoy
Present the vibrant, no-bake mini cheesecakes and delight in their colorful, creamy texture and sweet flavor.
Cheesecake Tips In Mini No-Bake Form
Mini Cheesecakes Keep Well Without Baking Twice
Ideas That Match Mini Cheesecakes
Easter No Bake Mini Cheesecakes Twists
FAQs
You’ll need an electric mixer, silicone molds, Ziploc bags, a microwave-safe bowl, and basic measuring tools like cups and spoons.
Absolutely! Feel free to choose any pastel or bright colors that suit your Easter theme. Gel food coloring works best for vibrant, even colors.
Ensure each color is completely set before adding the next color. Tap the mold gently after piping each color to help them settle without mixing.
Yes! Kids can help with mixing ingredients, choosing colors, and adding sprinkles. Just supervise them during steps involving the electric mixer and cutting Ziploc bag tips.
Print
Easter No Bake Mini Cheesecakes Recipe
- Total Time: 20 minutes
- Yield: 12 1x
Description
Delightful Easter No Bake Mini Cheesecakes blend creamy indulgence with springtime charm, offering a perfect sweet treat for festive gatherings. Rich cream cheese filling nestled in graham cracker crusts brings simple elegance you’ll savor with each delectable bite.
Ingredients
Cheesecake Filling:
- 24 ounces (680 grams) cream cheese, softened to room temperature
- 1 1/4 cups (300 milliliters) heavy whipping cream
- 1/2 cup (100 grams) granulated sugar
- 1/4 cup (60 milliliters) sour cream
- 1 teaspoon vanilla extract
Crust Ingredients:
- 1/2 cup (60 grams) graham cracker crumbs
- 1 tablespoon (12.5 grams) sugar
- 2 tablespoons (28 grams) butter
Decorative Ingredients:
- Food coloring (pink, purple, yellow, teal)
- Whipped cream (for garnish)
- Sprinkles (for garnish)
- Candy (optional, for topping)
Instructions
- Whip the heavy cream vigorously using an electric mixer until it forms sturdy, glossy peaks that hold their shape perfectly.
- In a separate mixing vessel, blend cream cheese, sugar, sour cream, and vanilla extract until the mixture becomes silky and uniform.
- Carefully incorporate the whipped cream into the cream cheese base, using gentle folding techniques to maintain the airy texture.
- Divide the unified mixture into four separate containers, then infuse each with distinct food coloring for a vibrant palette.
- Transfer each colored mixture into individual piping bags by cutting a small tip at the end for precise application.
- Artfully pipe alternating colors into silicone molds, creating playful layers and gently tapping the mold to eliminate air bubbles and establish an even surface.
- Prepare the graham cracker foundation by melting butter and combining it with graham cracker crumbs and sugar until the mixture achieves a perfect, cohesive consistency.
- Delicately sprinkle the graham cracker blend atop each cheesecake layer, pressing lightly to integrate it into the colorful base.
- Transfer the filled molds to the freezer, allowing them to solidify and set for approximately 2-4 hours until completely firm.
- Once fully chilled, carefully extract the mini cheesecakes from their molds and embellish with dollops of whipped cream, festive sprinkles, and decorative candies for a whimsical presentation.
Notes
- Whip cream carefully to achieve perfect stiff peaks, stopping just before it turns grainy.
- Ensure cream cheese is at room temperature for smoother, lump-free mixing.
- Use gel food coloring for vibrant, intense colors without affecting batter consistency.
- Gently fold whipped cream to maintain its airy texture and prevent deflation.
- Prep Time: 20 minutes
- Cook Time: 0 minutes
- Category: Desserts
- Method: Freezing
- Cuisine: American
Nutrition
- Serving Size: 12
- Calories: 300
- Sugar: 16 g
- Sodium: 250 mg
- Fat: 22 g
- Saturated Fat: 13 g
- Unsaturated Fat: 7 g
- Trans Fat: 0 g
- Carbohydrates: 25 g
- Fiber: 1 g
- Protein: 4 g
- Cholesterol: 70 mg
Daniel Bruns
Founder & Culinary Innovator
Expertise
Recipe development for home cooks, Nutritional analysis and meal planning, Culinary education and food writing
Education
Auguste Escoffier School of Culinary Arts
Diploma in Culinary Arts and Operations
Focus: Classical and contemporary cooking techniques, Culinary entrepreneurship and kitchen management, Menu development and food cost analysis
Daniel’s story started with flour on his face and a pie in the oven at his grandma’s house. He later sharpened his skills at the Auguste Escoffier School of Culinary Arts.
His goal? Recipes so simple you’ll want to cook every night. When he’s not whipping up one-pan wonders, Daniel’s outside picking herbs, hosting neighborhood cook-offs, or baking chocolate cakes with his kids, messy, sweet, and unforgettable.