
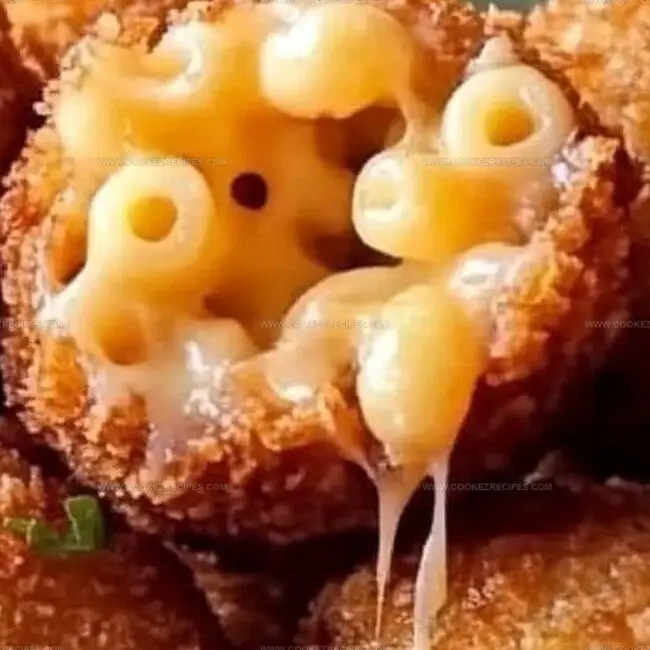
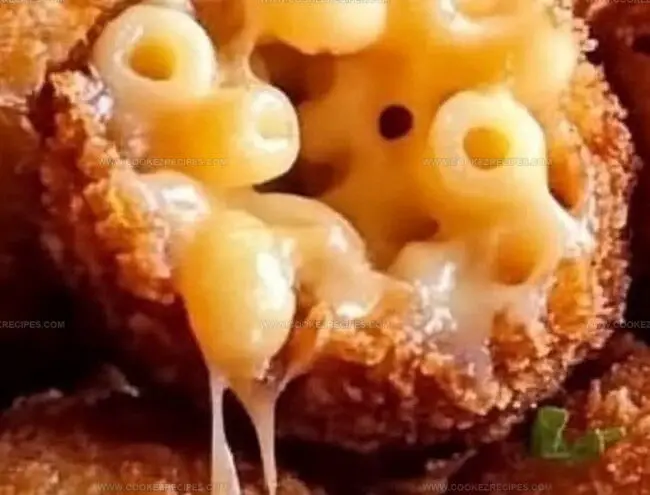
Crispy Fried Mac and Cheese Balls Recipe: Cheesy Comfort Bites
Mac and cheese takes an unexpected crispy twist with these delightful fried mac and cheese balls.
Crunchy exterior meets creamy interior in a magical appetizer that surprises everyone at the table.
Comfort food gets a playful upgrade through this ingenious recipe.
Small golden spheres promise maximum flavor and irresistible texture.
You’ll find these bite-sized morsels disappear faster than you can plate them.
Perfect for game day, potlucks, or spontaneous snack attacks, these balls bring serious excitement to classic comfort cuisine.
Dive in and create something spectacular that will make mouths water and conversations spark.
Fried Mac and Cheese Balls That Party Guests Love
Fried Mac and Cheese Balls Ingredient Set
Main Ingredients:Fried Mac and Cheese Balls Party Snack Method
Step 1: Whip Up Creamy Mac and Cheese Base
Create a silky cheese sauce by melting butter in a saucepan over medium heat.
Sprinkle in flour and stir until it turns a light golden color.
Slowly pour in milk, whisking continuously to prevent lumps.
Fold in:Season with salt and pepper.
Blend the velvety sauce with cooked macaroni, ensuring every noodle gets coated.
Transfer the mixture to a baking dish and refrigerate for at least 2 hours until completely set.
Step 2: Shape Delectable Cheese Spheres
Once the mac and cheese has chilled and firmed up, use a spoon or cookie scoop to create small, uniform balls.
Roll them gently between your palms to form smooth spheres about the size of a golf ball.
Step 3: Create a Crispy Coating
Set up a breading station with three shallow dishes.
First, dust the balls in flour, then dunk them in beaten eggs, and finally roll them in seasoned breadcrumbs.
Make sure each ball is completely covered for maximum crunch.
Step 4: Fry to Golden Perfection
Heat vegetable oil in a deep skillet or fryer until it reaches 350°F.
Carefully lower the coated mac and cheese balls into the hot oil.
Fry in small batches for 2-3 minutes, turning occasionally to ensure an even, golden-brown exterior.
Remove with a slotted spoon and drain on paper towels.
Step 5: Serve and Enjoy
Plate the crispy mac and cheese balls while they’re piping hot.
Accompany with your favorite dipping sauces like tangy marinara, cool ranch, or zesty spicy mayo.
Party Tips for Fried Mac and Cheese Balls
Fried Mac Balls Storage Tips
Great Matches for Fried Mac and Cheese Balls
Fun Ways To Make Fried Mac And Cheese Balls
FAQs
Chilling helps the mac and cheese firm up, making it easier to form stable balls that won’t fall apart during coating and frying. The cold temperature helps the cheese sauce solidify, creating a compact structure.
Absolutely! While cheddar and Parmesan work great, you can experiment with other melting cheeses like monterey jack, gruyere, or gouda to customize the flavor profile of your mac and cheese balls.
Make sure to coat the balls thoroughly in flour, egg, and breadcrumbs. Ensure the oil is at the right temperature (350°F) and don’t overcrowd the pan. Fry in small batches to maintain oil temperature and prevent balls from sticking together.
Yes! You can prepare the balls and keep them coated in breadcrumbs in the refrigerator for several hours before frying. Alternatively, you can freeze them uncooked and fry directly from frozen, adding a minute or two to the cooking time.
Print
Fried Mac and Cheese Balls Recipe
- Total Time: 15 minutes
- Yield: 4 1x
Description
Crispy fried mac and cheese balls elevate comfort food to a crowd-pleasing appetizer with golden, crunchy exteriors and gooey cheese centers. Crowd-pleasers like these deliver delicious nostalgia that will make guests cheer at any gathering.
Ingredients
Inside Ingredients (Mac and Cheese Base):
- 2 cups elbow macaroni, cooked and drained
- 2 cups (226 grams) shredded cheddar cheese
- 1/2 cup (50 grams) grated Parmesan cheese
- 1 cup (240 milliliters) milk
- 2 tablespoons unsalted butter
- 2 tablespoons all-purpose flour
- Salt and pepper to taste
Coating Ingredients:
- 1 cup (120 grams) all-purpose flour
- 2 large eggs, beaten
- 1 1/2 cups (180 grams) seasoned breadcrumbs
Frying Ingredient:
- Vegetable oil, for frying
Instructions
- Craft a velvety cheese foundation by gently melting butter in a saucepan, then whisk in flour until it develops a pale golden hue. Gradually stream milk while continuously stirring to create a silky, smooth base.
- Incorporate sharp cheddar and nutty Parmesan into the white sauce, stirring until the cheeses melt completely and form a luxurious, glossy mixture. Season with a pinch of salt and cracked black pepper for depth of flavor.
- Fold cooked macaroni into the rich cheese sauce, ensuring each pasta curve is generously coated. Transfer the creamy mixture to a container and refrigerate for several hours until it solidifies and becomes easily moldable.
- Use a cookie scoop or spoon to carve uniform spheres from the chilled mac and cheese mixture, rolling them gently between palms to create smooth, compact balls.
- Establish a breading station with separate bowls of flour, whisked eggs, and seasoned breadcrumbs. Carefully roll each cheese ball through flour, then bathe in egg wash, and finally coat thoroughly with crisp breadcrumbs.
- Heat vegetable oil in a deep skillet to 350°F, maintaining a consistent temperature. Carefully lower the breaded mac and cheese spheres into the hot oil, frying in small batches until they transform into golden-brown, crunchy delights.
- Remove the fried balls with a slotted spoon, allowing excess oil to drip away on a paper towel-lined plate. Serve immediately alongside tangy marinara, creamy ranch, or zesty spicy mayo for dipping.
Notes
- Chill thoroughly to ensure mac and cheese balls hold their shape during frying, preventing crumbling in hot oil.
- Use cold, day-old mac and cheese for firmer texture and easier ball formation, which helps maintain structural integrity.
- Double-coat breadcrumbs for extra crunch by dipping in egg wash and breadcrumbs twice, creating a thicker, more golden exterior.
- Experiment with cheese blends like smoked gouda or pepper jack to add unexpected flavor complexity and make the balls more gourmet.
- Prep Time: 15 minutes
- Cook Time: 15 minites
- Category: Snacks, Appetizer
- Method: Frying
- Cuisine: American
Nutrition
- Serving Size: 4
- Calories: 460
- Sugar: 2 g
- Sodium: 670 mg
- Fat: 25 g
- Saturated Fat: 12 g
- Unsaturated Fat: 10 g
- Trans Fat: 0.5 g
- Carbohydrates: 42 g
- Fiber: 2 g
- Protein: 16 g
- Cholesterol: 100 mg
Katherine Pierce
Recipe Curator & Food Educator
Expertise
Education
Boston University Metropolitan College
Certificate Program in the Culinary Arts
Focus: French and international cuisine techniques, Hands-on culinary training with industry professionals, Food industry insights and operations
Katherine grew up believing every dish has a story. She studied the art of food at Boston University and explored the history behind it. She loves pulling easy recipes from every corner of the world and putting them at your fingertips.
When Katherine’s not writing or testing new flavors, she’s teaching cooking classes, baking colorful mooncakes, or dreaming up new ways to mix old favorites with new twists.