
Easy Ham and Cheese Sliders Recipe for Crowd-Pleasing Bites
Crafting the perfect ham and cheese sliders takes creativity and a dash of culinary magic.
Layers of savory ingredients come together in a bite-sized delight that sparks joy.
Soft rolls cradle melted cheese and tender ham, creating an irresistible combination.
Weeknight dinners or game day gatherings become instantly more exciting with these compact treasures.
Minimal effort yields maximum flavor in every single slider.
Quick assembly means you can whip up this crowd-pleasing dish in mere minutes.
Ham and Cheese Sliders That Disappear Fast

Quick Kitchen Triumph: Effortless Party Sliders make entertaining a breeze.
Speedy Preparation: Whip up these delicious sliders in just 25 minutes from start to finish, perfect for spontaneous gatherings or last-minute cravings.
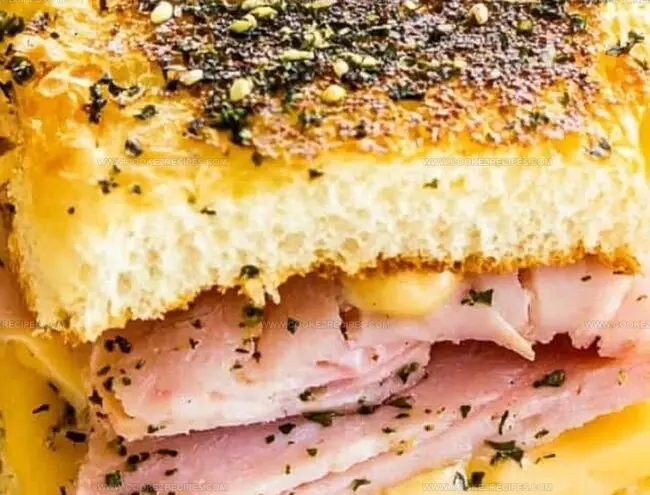
Crowd-Pleasing Flavor Explosion: Combine sweet Hawaiian rolls with savory ham, melty Swiss cheese, and a zesty butter glaze that guarantees everyone will ask for seconds.
Versatile Crowd-Pleaser: Ideal for game days, potlucks, family dinners, or casual weekend snacking – these sliders adapt to any social occasion with minimal effort and maximum deliciousness.
Ham and Cheese Sliders Ingredients
Bread Base:Protein Layer:Cheese:Glaze Ingredients:Preparation Extras:Ham & Cheese Sliders Snack Prep Instructions
Step 1: Warm Up the Oven
Crank the oven to a toasty 350°F.
Grab a 9×13-inch baking dish and give it a quick spray or butter rub to prevent sticking.
Step 2: Slice and Prepare Rolls
Carefully slice the Hawaiian rolls right down the middle, keeping them connected like a sandwich book.
Gently place the bottom half into the prepared baking dish.
Step 3: Build the Flavor Foundation
Layer your ingredients with love:Carefully place the top half of the rolls back on top, creating a cozy slider sandwich.
Step 4: Craft the Magical Glaze
In a mixing bowl, whisk together these flavor-packed ingredients:Mix until everything is perfectly combined and looking glossy.
Step 5: Brush and Bake
Generously paint the glaze all over the tops of the sliders.
Cover the dish with aluminum foil and slide into the preheated oven.
Bake for 15 minutes, then remove the foil and bake for an additional 5 minutes until the tops turn a gorgeous golden brown.
Step 6: Serve and Devour
Let the sliders rest for a few moments to cool slightly.
Slice them up and watch everyone dive in with excitement.
These little bites of heaven are best served warm and will disappear in seconds!
Party Snack Tips for Ham & Cheese Sliders
Ham Sliders Keep Fresh
Snacks That Go With Ham & Cheese Sliders
Fun Filling Ideas For Ham And Cheese Sliders
FAQs
Yes, you can prepare the sliders up to a day in advance. Assemble them completely, cover with foil, and refrigerate. When ready to serve, bake as directed, adding a few extra minutes to the cooking time.
No, poppy seeds are optional. If you don’t have them or prefer not to use them, you can skip them without affecting the overall flavor of the sliders.
Deli-style honey ham or black forest ham are excellent choices. Use thinly sliced, high-quality ham for the best taste and texture.
Absolutely! Provolone, mild cheddar, or American cheese are great alternatives that will work well in these sliders.
Print
Ham and Cheese Sliders Recipe
- Total Time: 30 minutes
- Yield: 12 1x
Description
Crowd-pleasing ham and cheese sliders deliver irresistible flavor in miniature form. Perfectly layered with savory ham, melted cheese, and buttery rolls, these bite-sized delights will vanish from your party platter in minutes.
Ingredients
Main Proteins and Bread:
- 12 Hawaiian Rolls
- 12 slices Deli Ham (smoked or honey ham)
- 6 slices Swiss Cheese (or preferred cheese)
Sauce and Seasonings:
- 1/2 cup (120 milliliters) Butter, melted
- 2 tablespoons Dijon Mustard
- 1 tablespoon Worcestershire Sauce
Dry Spices:
- 1/2 teaspoon Garlic Powder
- 1/2 teaspoon Onion Powder
- 1 teaspoon Poppy Seeds
Instructions
- Preheat the oven to 350°F and lightly grease a 9×13-inch baking dish, preparing the surface for the delectable sliders.
- Carefully slice the Hawaiian rolls horizontally, maintaining their connectivity, and gently position the bottom half in the prepared baking dish.
- Create a uniform layer of ham across the roll base, ensuring complete coverage of the bread surface.
- Distribute Swiss cheese evenly over the ham, allowing the cheese to drape smoothly across the meat.
- Delicately replace the top half of the rolls, aligning them precisely with the bottom layer.
- In a mixing bowl, combine melted butter, Dijon mustard, Worcestershire sauce, garlic powder, onion powder, and poppy seeds, whisking until the glaze becomes smooth and well-integrated.
- Using a pastry brush, generously coat the slider tops with the prepared glaze, ensuring complete and even coverage.
- Shield the sliders with aluminum foil and bake for 15 minutes, allowing the flavors to meld and the cheese to begin melting.
- Remove the foil and continue baking for an additional 5 minutes until the tops turn a golden brown and the edges become delightfully crispy.
- Allow the sliders to rest briefly after removing from the oven, then slice into individual portions and serve while warm.
Notes
- Gluten-Free Option: Swap Hawaiian rolls for gluten-free dinner rolls or cauliflower slider bases to accommodate gluten sensitivities.
- Cheese Alternatives: Experiment with provolone, cheddar, or dairy-free cheese for different flavor profiles and dietary needs.
- Make-Ahead Magic: Assemble sliders up to 24 hours in advance, refrigerate, and bake just before serving to save party prep time.
- Protein Swap: Replace ham with turkey, chicken, or plant-based deli slices for varied protein options and vegetarian adaptations.
- Prep Time: 10 minutes
- Cook Time: 20 minutes
- Category: Snacks, Appetizer
- Method: Baking
- Cuisine: American
Nutrition
- Serving Size: 12
- Calories: 310
- Sugar: 2 g
- Sodium: 600 mg
- Fat: 18 g
- Saturated Fat: 8 g
- Unsaturated Fat: 8 g
- Trans Fat: 0 g
- Carbohydrates: 27 g
- Fiber: 1 g
- Protein: 12 g
- Cholesterol: 35 mg
Katherine Pierce
Recipe Curator & Food Educator
Expertise
Education
Boston University Metropolitan College
Certificate Program in the Culinary Arts
Focus: French and international cuisine techniques, Hands-on culinary training with industry professionals, Food industry insights and operations
Katherine grew up believing every dish has a story. She studied the art of food at Boston University and explored the history behind it. She loves pulling easy recipes from every corner of the world and putting them at your fingertips.
When Katherine’s not writing or testing new flavors, she’s teaching cooking classes, baking colorful mooncakes, or dreaming up new ways to mix old favorites with new twists.