
Easy Homemade Pizza Crust Recipe: Crispy, Fluffy Perfection
Pizza lovers know a crispy homemade pizza crust can elevate any meal from ordinary to extraordinary.
Fresh ingredients make all the difference when crafting delectable pies.
Crafting your own dough might sound intimidating, but trust me, it’s simpler than you think.
Each kneading motion connects you to generations of culinary tradition.
Soft, pillowy textures start with understanding flour ratios and technique.
Warm kitchen aromas will draw everyone closer as you mix and roll.
Watch how a few basic ingredients become something magical that sparks conversation and joy.
Pizza Crust That’s Crisp Golden And Worth The Effort
Ingredients in Homemade Pizza Crust
Flour and Leavening Agents:Liquid and Fat Ingredients:Seasoning Ingredients:Optional Supporting Ingredients:Homemade Pizza Crust How-to
Step 1: Activate the Yeast
Combine warm water, sugar, and yeast in a large mixing bowl.
Stir gently until the ingredients are fully blended.
Let the mixture rest for 5-10 minutes until it becomes wonderfully foamy and fragrant.
Step 2: Build the Dough Foundation
Add to the yeast mixture:Mix the ingredients until they start to come together smoothly.
The mixture will begin to look like a rough, shaggy dough.
Step 3: Knead the Perfect Texture
Gradually incorporate the remaining flour, mixing until the dough pulls away from the sides of the bowl.
If the dough feels too sticky, sprinkle in a little extra flour, one tablespoon at a time.
The goal is a dough that barely clings to your fingers.
Step 4: Develop the Dough
Knead the dough for 5 minutes.
You can do this by hand on a clean surface or use a stand mixer on medium-low speed.
The dough should become smooth and elastic, with a silky texture that springs back when touched.
Step 5: First Rise
Shape the dough into a beautiful round ball.
Place it in a lightly oiled bowl, turning to coat the entire surface.
Cover with plastic wrap and let it rise in a warm spot until it doubles in size, typically 1-2 hours.
Step 6: Prepare for Baking
Preheat your oven with a pizza stone or baking sheet:Step 7: Shape the Pizza Bases
Gently knead the risen dough and divide it:Let the dough balls rest, covered, for 15 minutes.
Step 8: Roll and Prep the Crust
Roll each dough ball into a 12-inch circle on a generously floured surface.
Remove the preheated pizza stone or baking sheet from the oven and prepare it with:Step 9: Final Crust Preparation
Transfer the dough to the prepared pan.
Pinch the edges to create a beautiful rimmed crust.
Brush lightly with olive oil and sprinkle with garlic salt.
Prick the surface with a fork to prevent bubble formation.
Step 10: Add Toppings and Bake
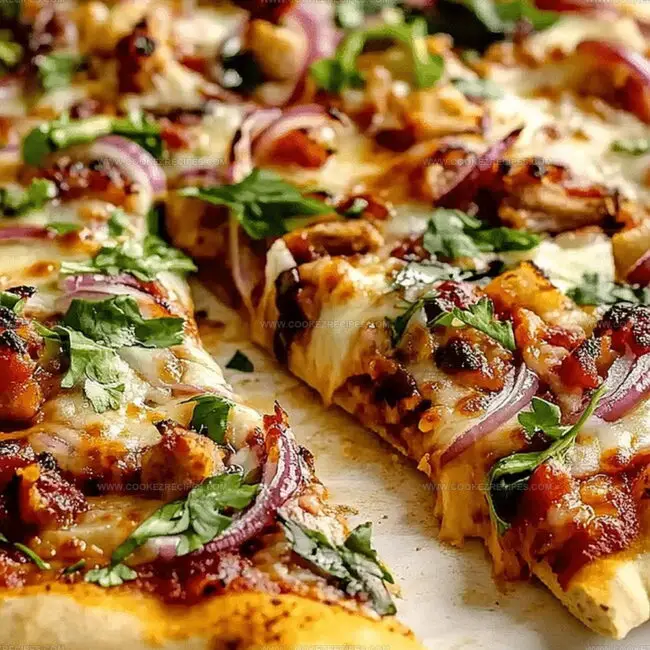
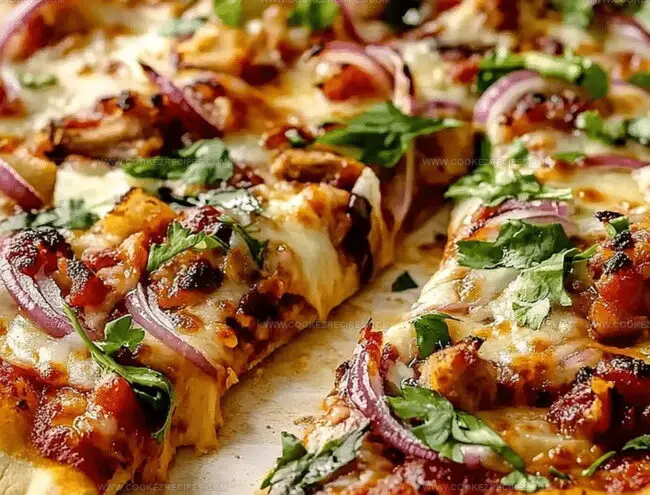
Spread pizza sauce and add your favorite toppings.
Pizza Crust Dough-Handling Tips
Pizza Crust That’s Still Perfect Next Day
Crisp Picks To Go With Pizza Crust
Pizza Crust Prep Techniques
FAQs
Warm water (around 110°F) activates the yeast, helping it bloom and create those tiny bubbles that make your pizza crust light and fluffy. Cold water won’t wake up the yeast, while hot water can kill it.
Yes! You can prepare the dough and let it rise, then refrigerate it for up to 24 hours. Just bring it to room temperature before stretching and baking. This actually helps develop deeper flavor in the crust.
The dough should be smooth, elastic, and slightly tacky but not sticky. When you poke it, it should spring back quickly. Proper kneading develops gluten, which gives your crust its signature chewy texture.
This could happen if your yeast is old or the environment is too cold. Make sure your yeast is fresh, and let the dough rise in a warm, draft-free spot like near a preheating oven or in a slightly warm oven (turned off).
Print
Homemade Pizza Crust Recipe
- Total Time: 2 hours 25 minutes
- Yield: 2 1x
Description
Crispy, golden homemade pizza crust brings Italian pizzeria magic straight to kitchen counters. Warm, chewy dough promises a delicious canvas for favorite toppings you’ll savor with each delightful slice.
Ingredients
Main Ingredients:
- 3 1/2 cups unbleached all-purpose flour
- 1 1/2 cups warm water (105-110°F / 40-43°C)
- 6 ounces (170 grams) fresh mozzarella, cubed
Leavening and Seasoning Ingredients:
- 1 tablespoon active dry yeast
- 1 tablespoon sugar
- 1 teaspoon salt
- 1 tablespoon olive oil
Additional Ingredients:
- 1/2 cup pizza sauce
- Olive oil or nonstick cooking spray
- Garlic salt
- Cornmeal
Instructions
- Activate the yeast by combining warm water, sugar, and yeast in a large mixing bowl, creating a foundation for a rich, elastic pizza dough.
- Allow the mixture to rest and develop, watching for a foamy surface that signals active yeast fermentation.
- Introduce olive oil and salt to the mixture, then incorporate the first portion of flour, blending until a cohesive base forms.
- Gradually fold in the remaining flour, adjusting the consistency by adding small amounts if the dough feels excessively moist.
- Develop the dough’s gluten structure through thorough kneading, either manually or using a stand mixer, until smooth and elastic.
- Transfer the kneaded dough to a lightly oiled bowl, covering it to create a warm environment for rising.
- Let the dough expand and develop flavor, nearly doubling in volume over 1-2 hours.
- Prepare the baking surface by preheating a pizza stone or baking sheet at an intense temperature – 475°F for standard crust or 550°F for a crisp thin crust.
- Gently reshape the risen dough, dividing it into equal portions – two for normal crust or three for thin crust.
- Allow the divided dough to rest briefly, relaxing the gluten and making rolling easier.
- Roll each portion into a circular shape on a generously floured surface, creating an even, thin base.
- Carefully transfer the rolled dough onto a preheated, olive oil-coated pan sprinkled with cornmeal for extra texture.
- Enhance the crust’s flavor by brushing with olive oil and sprinkling garlic salt around the edges.
- Prevent air bubbles by gently pricking the surface with a fork.
- Layer with pizza sauce, spreading evenly to the edges, and arrange chosen toppings with artistic precision.
- For a standard crust, bake at 475°F for 12 minutes, finishing with a quick broil to achieve golden, crispy edges.
- Thin crust enthusiasts should bake at 550°F for 8-10 minutes, watching for bubbly cheese and a perfectly crisp foundation.
Notes
- Activate the yeast properly by using warm water between 105-110°F to ensure perfect rising without killing the yeast.
- Adjust flour gradually to achieve the right dough consistency, which should be slightly tacky but not sticking excessively to your fingers.
- Optimize rising time in a warm, draft-free area like a turned-off oven with the light on to help dough double in size effectively.
- Experiment with alternative flours like whole wheat or gluten-free blends for dietary modifications, but expect slight texture changes in the final crust.
- Prep Time: 2 hours 15 minutes
- Cook Time: 10 minutes
- Category: Lunch, Dinner
- Method: Baking
- Cuisine: Italian
Nutrition
- Serving Size: 2
- Calories: 370
- Sugar: 1 g
- Sodium: 345 mg
- Fat: 10 g
- Saturated Fat: 3 g
- Unsaturated Fat: 7 g
- Trans Fat: 0 g
- Carbohydrates: 58 g
- Fiber: 2 g
- Protein: 12 g
- Cholesterol: 15 mg
Daniel Bruns
Founder & Culinary Innovator
Expertise
Recipe development for home cooks, Nutritional analysis and meal planning, Culinary education and food writing
Education
Auguste Escoffier School of Culinary Arts
Diploma in Culinary Arts and Operations
Focus: Classical and contemporary cooking techniques, Culinary entrepreneurship and kitchen management, Menu development and food cost analysis
Daniel’s story started with flour on his face and a pie in the oven at his grandma’s house. He later sharpened his skills at the Auguste Escoffier School of Culinary Arts.
His goal? Recipes so simple you’ll want to cook every night. When he’s not whipping up one-pan wonders, Daniel’s outside picking herbs, hosting neighborhood cook-offs, or baking chocolate cakes with his kids, messy, sweet, and unforgettable.