
Soft and Luscious Red Velvet Cookies Recipe
Sweet chocolate lovers have stumbled upon a magical red velvet cookies sensation that promises pure delight.
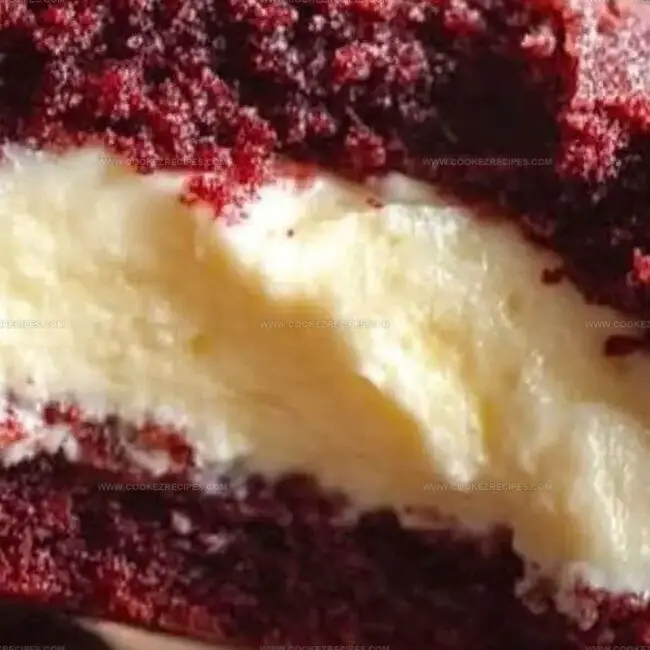
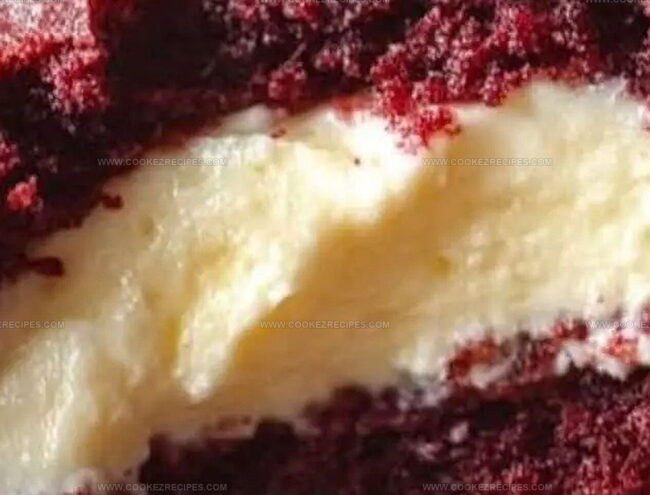
Crimson-hued dough swirls with rich cream cheese undertones, creating an irresistible treat.
Soft centers and crisp edges make these cookies a true culinary masterpiece.
Decadent cocoa notes dance through each bite, tempting even the most discerning palate.
Chocolate chips nestled within add unexpected bursts of pure pleasure.
Kitchen adventures await you with this simple yet stunning recipe that guarantees smiles all around.
Let’s bake something spectacular that will have everyone begging for seconds.
Why Red Velvet Cookies with Cheesecake Are So Irresistible
Red Velvet Cheesecake Cookies Ingredients
Cookie Base Ingredients:Wet Ingredients:Cheesecake Filling Ingredients:Finishing Ingredient:Red Velvet Cookies with Cheesecake Center Prep
Step 1: Prepare Dry Ingredients
Whisk together flour, cocoa powder, baking soda, and salt in a medium bowl until thoroughly combined.
Set the mixture aside for later use.
Step 2: Create Cookie Base
Beat butter, granulated sugar, and brown sugar using a mixer until smooth and creamy.
Add egg, milk, and vanilla extract, mixing until fully incorporated.
Scrape down the bowl sides to ensure even blending.
Step 3: Form Cookie Dough
Slowly mix dry ingredients into wet ingredients.
Blend in food coloring until the desired rich red shade is achieved.
The dough will feel slightly sticky.
Wrap the dough tightly and refrigerate for 1.5 to 3 hours.
Step 4: Whip Cheesecake Filling
In a separate bowl, beat cream cheese, confectioners’ sugar, flour, and vanilla extract until silky smooth.
Drop teaspoon-sized portions onto a lined baking sheet and freeze for at least 1.5 hours.
Step 5: Shape Cheesecake Centers
Remove frozen cheesecake portions and gently roll into small balls.
Return to refrigerator to keep cold and firm.
Step 6: Prepare Baking Space
Preheat oven to 350°F.
Line two baking sheets with parchment paper or silicone mats.
Step 7: Assemble Cookie Packages
Remove chilled dough and let sit for 20 minutes if overly firm.
Roll dough into tablespoon-sized balls.
Create a thumb indent in each ball.
Place a cold cheesecake ball inside and cover completely with another dough ball, sealing edges carefully.
Step 8: Final Cookie Preparation
Roll stuffed cookie balls in granulated sugar.
Place on baking sheets, spacing 3 inches apart.
Bake for 12-13 minutes until edges set but centers remain soft.
Step 9: Cool and Serve
Allow cookies to rest on baking sheet for 5 minutes.
Transfer to a wire rack to cool completely.
Step 10: Store and Enjoy
Cookies can be stored at room temperature for 3 days or refrigerated for up to 1 week.
Cheesecake-Filled Red Velvet Cookie Tips
Red Velvet Cookies That Store Soft and Creamy
Sweet Matches for Red Velvet Cheesecake Cookies
Red Velvet Cookies with Fun Add-Ins
FAQs
The bright red color comes from food coloring added directly to the cookie dough. You can adjust the amount of food coloring to achieve your desired shade of red.
Freezing the cream cheese filling beforehand and completely covering it with cookie dough helps prevent leakage. Make sure to seal the edges of the cookie dough completely around the cream cheese ball.
Yes! Both the cookie dough and cream cheese filling can be prepared and chilled up to 2-3 days in advance. This makes the recipe perfect for advance preparation and saves time on baking day.
Chilling the dough helps prevent spreading and allows the flavors to develop. It also makes the dough easier to handle and helps the cookies maintain their shape during baking.
Print
Luscious Red Velvet Cookies Recipe
- Total Time: 2 hours 57 minutes
- Yield: 24 1x
Description
Indulgent Red Velvet Cookies cradle a dreamy cheesecake center, melting hearts with rich cocoa and tangy cream cheese. Luxurious bites promise pure bliss you cannot resist, inviting sweet moments of pure dessert delight.
Ingredients
Dry Ingredients:
- 1 2/3 cups (210g) all-purpose flour
- 1/4 cup (21g) unsweetened natural cocoa powder
- 1 teaspoon baking soda
- 1/4 teaspoon salt
Wet Ingredients:
- 1/2 cup (8 tablespoons; 113g) unsalted butter, softened to room temperature
- 1/2 cup (100g) granulated sugar
- 1/2 cup (100g) packed light or dark brown sugar
- 1 large egg, at room temperature
- 1 tablespoon (15 milliliters) milk
- 2 teaspoons pure vanilla extract
- 1 tablespoon red food coloring (liquid, gel, or 2 teaspoons beet powder alternative)
Cream Cheese Filling:
- 4 ounces (113 grams) full-fat brick cream cheese, room temperature
- 1 3/4 cups (210g) confectioners sugar
- 1 tablespoon (8g) all-purpose flour
- 1/2 teaspoon pure vanilla extract
For Rolling:
- 1/2 cup (100g) granulated sugar
Instructions
- Craft a uniform mixture of cocoa-infused dry ingredients by thoroughly blending flour, cocoa powder, baking soda, and salt. Set this foundation aside for later use.
- Utilize an electric mixer to cream butter with granulated and brown sugars until achieving a silky, homogeneous texture. Incorporate egg, milk, and vanilla extract, mixing until thoroughly integrated and periodically scraping bowl edges.
- Gently fold dry ingredients into wet mixture, ensuring smooth incorporation. Introduce vibrant red food coloring, adjusting quantity for desired intensity. The resulting dough will possess a slight tackiness. Wrap securely and refrigerate for minimum 1.5 hours.
- Prepare cheesecake filling by whipping cream cheese with confectioners’ sugar, flour, and vanilla extract until achieving a luxurious, velvety consistency. Deposit small dollops onto a freezer-compatible baking sheet and freeze for at least 1.5 hours.
- Transform frozen cream cheese portions into delicate spheres, understanding they might remain slightly adhesive. Relocate to refrigerator to maintain optimal coldness.
- Preheat oven to 350°F. Line baking sheets with parchment paper or silicone mats for optimal cookie performance.
- Extract chilled dough, allowing brief room temperature rest if needed. Construct cookie spheres, creating a central cavity in each. Nestle frozen cream cheese orbs within dough pockets, meticulously sealing to ensure complete encapsulation.
- Delicately roll assembled cookies in remaining granulated sugar. Position on baking sheets, maintaining generous spacing. Bake until edges solidify while centers retain softness, approximately 12-13 minutes.
- Allow cookies to rest momentarily on baking sheet before transferring to wire rack for complete cooling.
- Store cookies in sealed container at room temperature for three days or refrigerate up to one week, preserving their delectable quality.
Notes
- Chill the dough thoroughly to prevent spreading and enhance flavor intensity during baking.
- Freeze cream cheese filling beforehand to ensure clean, compact centers that won’t leak during cooking.
- Use gel food coloring for more vibrant red color without altering dough consistency.
- When rolling cookies, keep hands slightly damp to prevent sticky dough from clinging to fingers.
- Prep Time: 2 hours, 45 minutes
- Cook Time: 12 minutes
- Category: Desserts, Snacks
- Method: Baking
- Cuisine: American
Nutrition
- Serving Size: 24
- Calories: 150
- Sugar: 14g
- Sodium: 100mg
- Fat: 7g
- Saturated Fat: 4g
- Unsaturated Fat: 3g
- Trans Fat: 0g
- Carbohydrates: 20g
- Fiber: 0g
- Protein: 2g
- Cholesterol: 20mg
Katherine Pierce
Recipe Curator & Food Educator
Expertise
Education
Boston University Metropolitan College
Certificate Program in the Culinary Arts
Focus: French and international cuisine techniques, Hands-on culinary training with industry professionals, Food industry insights and operations
Katherine grew up believing every dish has a story. She studied the art of food at Boston University and explored the history behind it. She loves pulling easy recipes from every corner of the world and putting them at your fingertips.
When Katherine’s not writing or testing new flavors, she’s teaching cooking classes, baking colorful mooncakes, or dreaming up new ways to mix old favorites with new twists.