
Monster Cookie Bars Recipe with Chewy Sweet Flavor
Whipping up these decadent monster cookie bars will transport you to a nostalgic playground of sweet memories.
Childhood favorites collide in a delightful mashup of flavors and textures.
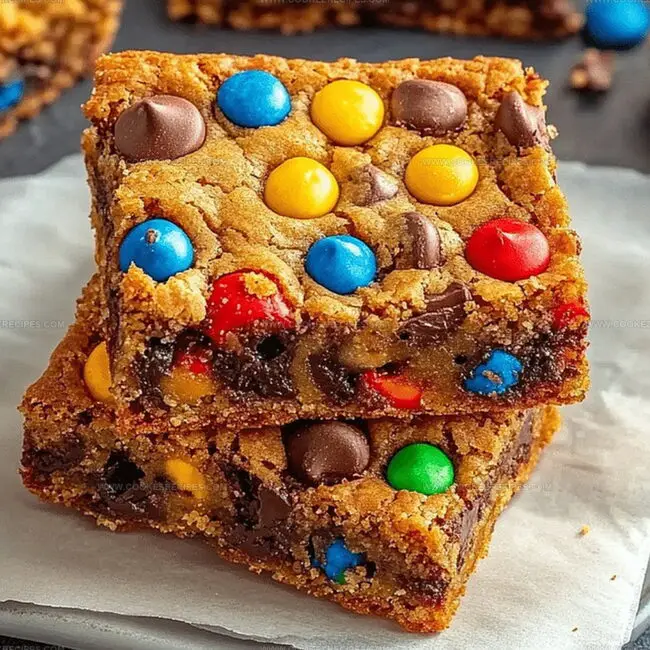
Colorful candies and rich chocolate chips dance across a hearty oatmeal base that promises pure indulgence.
Comfort and excitement blend perfectly in each irresistible bite.
Peanut butter provides a creamy backbone that anchors these playful treats.
Crispy edges and soft centers create a textural symphony that tempts every dessert lover.
Bake these and watch smiles light up around the table.
Monster Cookie Bars That Are Loaded With Fun
Mix for Monster Cookie Bars
Base Ingredients:Binding Ingredients:Dry Ingredients:Mix-In Ingredients:Monster Cookie Bars – How to Mix and Bake

Step 1: Prepare Baking Station
Grab a 9×13-inch baking pan and line it with parchment paper.
Make sure the paper hangs over the sides for easy removal.
Set your oven to 350°F (175°C) so it’s ready to go.
Step 2: Create Creamy Base
In a large bowl, mix together:Whisk these ingredients until they form a smooth, glossy mixture that looks like a delicious caramel.
Step 3: Bind With Eggs
Crack eggs into the sugar mixture and pour in vanilla extract.
Stir vigorously until everything blends into a rich, golden batter that looks super inviting.
Step 4: Build Cookie Foundation
Toss in your dry ingredients:Fold everything together until you have a consistent dough that holds together perfectly.
Step 5: Load Up With Goodies
Gently fold in:Distribute these colorful mix-ins throughout the dough so every bite is packed with flavor.
Step 6: Create Bakery-Style Topping
Spread the dough evenly into the prepared pan.
Sprinkle extra M&Ms and mini chocolate chips across the top for a stunning, professional look.
Step 7: Bake To Perfection
Slide the pan into the preheated oven.
Bake for 20-25 minutes until the edges turn a beautiful golden brown and the center looks set but still slightly soft.
Step 8: Cool And Slice
Remove from the oven and let the bars cool completely.
Use the parchment paper to lift the entire batch out, then slice into generous squares.
Enjoy your monster cookie bars!
Cookie Bar Tips With Monster Size Joy
Monster Cookie Bars Stay Chewy After Cooling
Fun Sides For Monster Bars
Monster Cookie Bars Mix-Ups
FAQs
Yes, simply substitute the all-purpose flour with a gluten-free flour blend. Make sure to use certified gluten-free oats as well.
Look for golden brown edges and a set center. A toothpick inserted in the middle should come out with a few moist crumbs, not completely wet.
Absolutely! Wrap the bars tightly in plastic wrap and then aluminum foil. They’ll stay fresh in the freezer for up to 3 months. Thaw at room temperature before enjoying.
You can replace peanut butter with almond butter or sunflower seed butter for a similar texture and richness.
Print
Monster Cookie Bars Recipe
- Total Time: 40 minutes
- Yield: 12 1x
Description
Monster cookie bars combine irresistible peanut butter, chocolate chips, and colorful M&Ms in one incredible dessert. Crammed with nostalgic flavors and childhood memories, these bars promise delightful sweetness you’ll crave again and again.
Ingredients
Primary Ingredients:
- 1 cup creamy peanut butter
- 2 large eggs
- 1 cup brown sugar, packed
- 1/2 cup granulated sugar
- 1 cup unsalted butter, melted
Baking Dry Ingredients:
- 2 cups old-fashioned oats
- 1 1/2 cups all-purpose flour
- 1 teaspoon baking soda
- 1/2 teaspoon salt
Mix-Ins and Extras:
- 1 cup semi-sweet chocolate chips
- 1 cup M&Ms
- 1/2 cup mini chocolate chips
- 2 teaspoons vanilla extract
Instructions
- Prepare the baking vessel by warming the oven to 350°F and lining a 9×13-inch pan with parchment paper, ensuring complete coverage of the bottom and sides.
- Create a smooth foundation by whisking melted butter, brown sugar, granulated sugar, and peanut butter in a spacious mixing bowl until the mixture transforms into a glossy, uniform consistency.
- Incorporate eggs and vanilla extract into the buttery mixture, stirring vigorously to achieve a well-blended emulsion that integrates all liquid components seamlessly.
- Gradually fold in dry ingredients – oats, flour, baking soda, and salt – using gentle, sweeping motions to prevent overmixing and maintain a tender texture.
- Delicately introduce chocolate chips and M&Ms throughout the dough, distributing them evenly to guarantee a balanced sweet-and-chocolatey experience in every bite.
- Transfer the batter into the prepared pan, using a spatula to spread the mixture into a uniform layer, then artfully scatter additional M&Ms and mini chocolate chips across the surface for visual appeal.
- Position the pan in the preheated oven and bake for 22-24 minutes, watching for golden-brown edges and a set center that indicates perfect doneness.
- Remove from oven and allow the bars to cool completely at room temperature, which helps them firm up and makes clean, precise cutting easier.
- Once fully cooled, slice into rectangular bars using a sharp knife, creating consistent portions that showcase the colorful, chocolate-studded interior.
Notes
- Customize chocolate types by swapping M&Ms with different flavors or seasonal varieties for festive twists.
- Swap peanut butter with almond or sunflower seed butter for nut-free or alternative dietary needs.
- Use gluten-free oats and flour blend to make this recipe celiac and gluten-sensitive friendly.
- Reduce sugar content by using monk fruit sweetener or cutting sugar quantities by 25% without compromising texture.
- Prep Time: 10 minutes
- Cook Time: 25-30 minutes
- Category: Desserts, Snacks
- Method: Baking
- Cuisine: American
Nutrition
- Serving Size: 12
- Calories: 370
- Sugar: 30 g
- Sodium: 160 mg
- Fat: 16 g
- Saturated Fat: 8 g
- Unsaturated Fat: 6 g
- Trans Fat: 0 g
- Carbohydrates: 52 g
- Fiber: 2 g
- Protein: 7 g
- Cholesterol: 40 mg
Daniel Bruns
Founder & Culinary Innovator
Expertise
Recipe development for home cooks, Nutritional analysis and meal planning, Culinary education and food writing
Education
Auguste Escoffier School of Culinary Arts
Diploma in Culinary Arts and Operations
Focus: Classical and contemporary cooking techniques, Culinary entrepreneurship and kitchen management, Menu development and food cost analysis
Daniel’s story started with flour on his face and a pie in the oven at his grandma’s house. He later sharpened his skills at the Auguste Escoffier School of Culinary Arts.
His goal? Recipes so simple you’ll want to cook every night. When he’s not whipping up one-pan wonders, Daniel’s outside picking herbs, hosting neighborhood cook-offs, or baking chocolate cakes with his kids, messy, sweet, and unforgettable.