Pepperoni Pizza Wraps Recipe for Quick Weeknight Cravings
Whipping up these delectable pepperoni pizza wraps promises a quick culinary adventure that’ll make your taste buds dance.
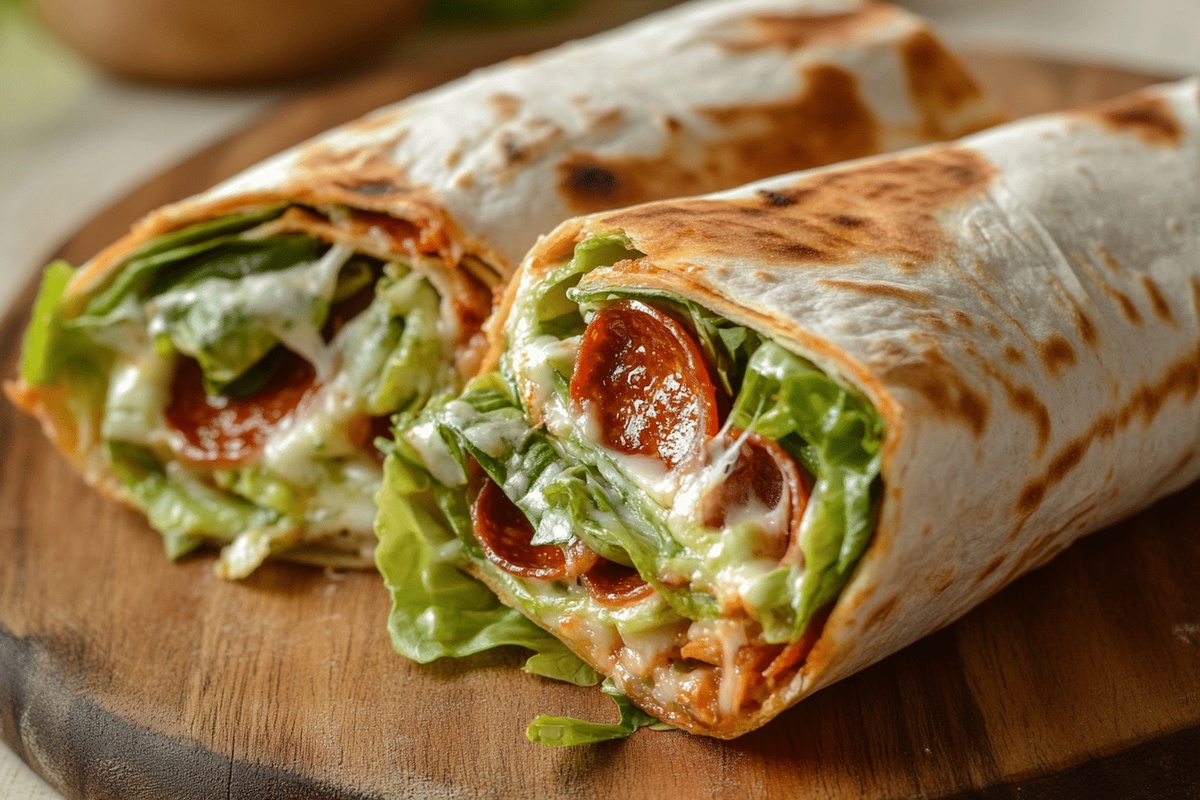
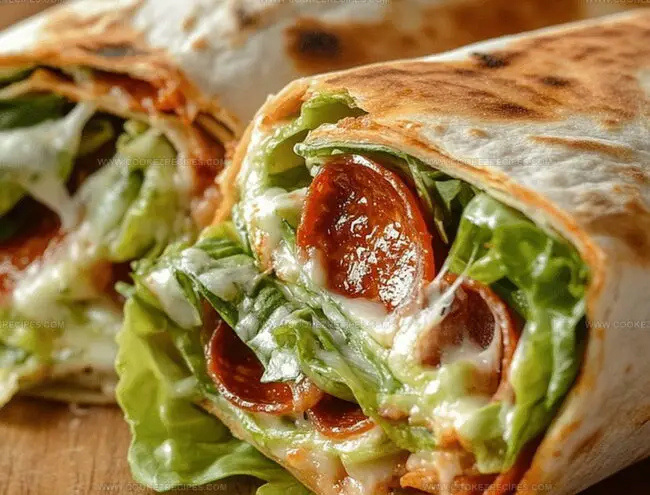
Crispy tortillas cradle melted cheese and zesty pepperoni in a handheld marvel.
Comfort food meets convenience with minimal prep and maximum flavor.
Quick-thinking cooks can assemble this meal faster than ordering takeout.
Layers of savory ingredients create a portable feast perfect for lunch or dinner.
Casual dining gets a playful twist you’ll absolutely adore.
Unwrap deliciousness and satisfy those pizza cravings in minutes!
Pepperoni Pizza Wraps That Are Easy And Cheesy
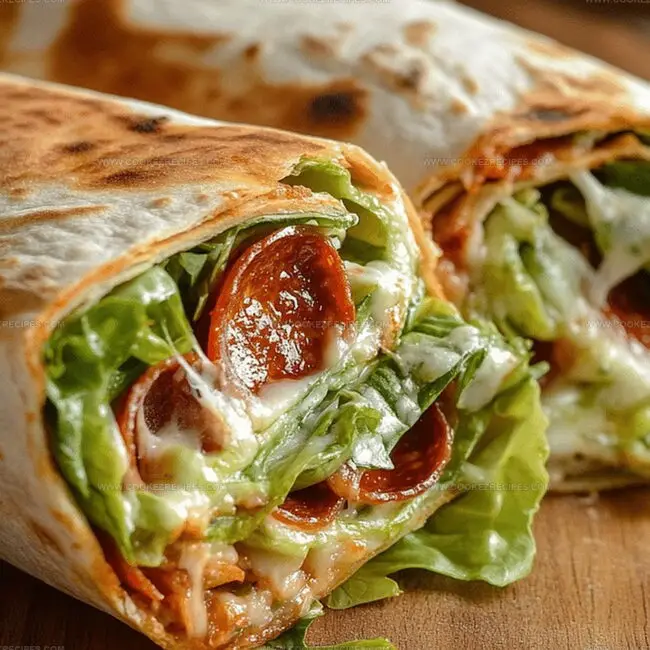
What’s Rolled in Pepperoni Pizza Wraps
Pizza Wrap Base:Cheese and Meat:Salad Components:Pepperoni Pizza Wraps – Easy Instructions
Step 1: Fire Up the Broiler
Position your oven rack on the bottom level and activate the broiler.
This high-heat setting will help crisp the wrap quickly.
Step 2: Prep the Tortilla Canvas
Lay out two fresh flour tortillas on a sturdy baking sheet, ensuring they’re nicely spaced apart.
Step 3: Spread the Sauce Foundation
Cover the center of each tortilla with a delicate layer of marinara sauce, making sure to spread evenly.
Step 4: Layer the Cheesy Goodness
Generously sprinkle mozzarella cheese over the marinara, creating a smooth base.
Arrange pepperoni slices across the cheese.
Step 5: Broil to Perfection
Slide the baking sheet under the broiler.
Watch closely as the pepperoni sizzles and crisps and the cheese melts into a golden pool.
This should take about 3-4 minutes.
Step 6: Whip Up the Caesar Salad
Toss together your Caesar salad ingredients in a large mixing bowl:Squeeze fresh lemon juice and season with salt and pepper.
Step 7: Create the Wrap
Carefully transfer half the Caesar salad onto each tortilla pizza.
Gently roll the tortilla into a compact wrap, ensuring the fillings stay tucked inside.
Step 8: Serve and Devour
Plate your Pepperoni Pizza Caesar Wraps immediately and enjoy the delicious combination of crispy pizza and fresh salad.
Pizza Wrap Tips With Pepperoni Melt
Pepperoni Pizza Wraps That Reheat with Gooey
Easy Combos For Pizza Wraps
Pepperoni Pizza Wrap Ideas
FAQs
Yes, you can substitute flour tortillas with whole wheat, corn, or gluten-free tortillas based on your preference or dietary needs.
Absolutely! Replace pepperoni with vegetarian pepperoni, sliced bell peppers, or mushrooms to create a meat-free version.
While best served fresh, you can prepare the components separately and assemble just before serving to maintain the crispy texture.
You can use a toaster oven or regular oven at 425°F for similar results, watching carefully to prevent burning.
Print
Pepperoni Pizza Wraps Recipe
- Total Time: 10 minutes
- Yield: 2 1x
Description
Pepperoni pizza wraps pack classic Italian flavors into a convenient handheld delight. Crispy tortillas embrace zesty pepperoni, melted cheese, and tangy marinara sauce, offering a quick and satisfying meal you’ll crave.
Ingredients
Main Ingredients:
- 1/2 cup cup n crisp pepperoni
- 1/2 cup mozzarella cheese, shredded
- 2 large tortillas
Sauce and Liquid Ingredients:
- 1/3 cup marinara sauce
- 1 tablespoon fresh lemon juice (optional)
Salad Ingredient:
- 1 (10.5 ounces / 298 grams) bag prepared Caesar salad (or about 3 cups homemade Caesar)
Instructions
- Prepare the broiler by adjusting the oven rack to the bottom position and heating to high intensity.
- Arrange flour tortillas on a sturdy baking sheet, ensuring they are separated to prevent overlapping.
- Distribute marinara sauce across the center of each tortilla, creating a thin, even layer that covers the surface.
- Generously sprinkle mozzarella cheese over the sauce, covering it completely with a uniform cheese base.
- Carefully layer pepperoni slices atop the cheese, allowing them to slightly overlap for maximum flavor coverage.
- Slide the baking sheet under the broiler, monitoring closely as the cheese melts and pepperoni edges crisp and curl.
- Remove the tortillas once the cheese bubbles and pepperoni develops a rich, golden-brown rim, typically within 2-3 minutes.
- Craft the Caesar salad by combining ingredients in a spacious mixing bowl, squeezing fresh lemon juice to enhance the flavor profile.
- Season the salad with a delicate balance of salt and pepper, tossing gently to ensure even distribution.
- Divide the Caesar salad evenly between the two prepared tortilla pizzas.
- Carefully roll each tortilla into a compact wrap, tucking in the sides to secure the fillings.
- Plate immediately and savor the warm, crispy Pepperoni Pizza Caesar Wraps while they’re at peak temperature and texture.
Notes
- Customize tortilla thickness for crispier or softer wraps by selecting different flour tortilla brands.
- Prevent soggy wraps by patting pepperoni slices with paper towels to remove excess oil before placing on tortillas.
- Experiment with cheese varieties like provolone or pepper jack for unique flavor profiles and added depth to the pizza wrap.
- Use gluten-free tortillas and dairy-free cheese alternatives to make this recipe suitable for specific dietary restrictions.
- Prep Time: 5 minutes
- Cook Time: 5 minutes
- Category: Lunch, Snacks, Appetizer
- Method: Broiling
- Cuisine: Italian
Nutrition
- Serving Size: 2
- Calories: 525
- Sugar: 3 g
- Sodium: 1120 mg
- Fat: 30 g
- Saturated Fat: 10 g
- Unsaturated Fat: 18 g
- Trans Fat: 0 g
- Carbohydrates: 43 g
- Fiber: 3 g
- Protein: 23 g
Daniel Bruns
Founder & Culinary Innovator
Expertise
Recipe development for home cooks, Nutritional analysis and meal planning, Culinary education and food writing
Education
Auguste Escoffier School of Culinary Arts
Diploma in Culinary Arts and Operations
Focus: Classical and contemporary cooking techniques, Culinary entrepreneurship and kitchen management, Menu development and food cost analysis
Daniel’s story started with flour on his face and a pie in the oven at his grandma’s house. He later sharpened his skills at the Auguste Escoffier School of Culinary Arts.
His goal? Recipes so simple you’ll want to cook every night. When he’s not whipping up one-pan wonders, Daniel’s outside picking herbs, hosting neighborhood cook-offs, or baking chocolate cakes with his kids, messy, sweet, and unforgettable.