
Fluffy Homemade White Bread From Scratch Recipe
Crafting homemade white bread from scratch might sound intimidating, but trust me, it’s simpler than you think.
Soft, pillowy loaves emerge from your kitchen with minimal effort and maximum satisfaction.
Baking bread connects us to centuries of culinary tradition and fills our homes with irresistible aromas.
Kneading dough becomes a meditative process that calms the mind and delights the senses.
Professional bakers understand that quality ingredients make all the difference in creating memorable bread.
Learning this fundamental skill unlocks a world of delicious possibilities for home cooks.
You’ll feel like a kitchen champion after mastering this straightforward technique that transforms basic ingredients into pure comfort.
One slice of this warm, fresh bread will inspire you to become a confident home baker.
White Bread From Scratch That’s Fluffy and Golden

Homemade White Bread (Best Ever) Ingredients
Bread Base Ingredients:Flavor and Binding Ingredients:Finishing Ingredients:White Bread from Scratch Instructions

Step 1: Awaken the Yeast
Mix warm water, sugar, and yeast in a small bowl.
Let the mixture sit quietly until it becomes frothy and bubbly, indicating the yeast is alive and ready to work its magic.
The liquid will look foamy and have a distinct yeasty aroma.
Step 2: Combine Initial Ingredients
Grab a large mixing bowl and blend flour with salt.
Pour in the activated yeast mixture and melted butter.
Stir everything together until a soft, sticky dough begins to take shape.
The ingredients will start to form a cohesive mass.
Step 3: Develop Dough Texture
Gradually introduce remaining flour into the dough.
Knead continuously, working the flour into the mixture.
Continue kneading until the dough transforms into a smooth, stretchy consistency.
The texture should feel soft and slightly tacky but not stick to your hands.
Step 4: Allow First Rise
Transfer the dough to a greased bowl, ensuring the entire surface is coated with a light layer of oil.
Cover with a clean kitchen towel and place in a warm, draft-free area.
Wait patiently as the dough doubles in size, which typically takes about 1-1.5 hours.
Step 5: Shape Beautiful Loaves
Gently deflate the risen dough by pressing down with your hands.
Divide the dough into two equal portions.
Carefully shape each section into a smooth loaf.
Place the formed loaves into greased 9×5-inch baking pans.
Step 6: Prepare for Final Rise
Cover the loaf pans and return them to a warm spot.
Allow the dough to rise again until it reaches approximately one inch above the pan’s rim.
This second rise typically takes 30-45 minutes.
Step 7: Bake to Golden Perfection
Preheat the oven to 375°F.
Slide the loaves into the hot oven and bake until the tops turn a beautiful golden brown.
The bread is ready when it sounds hollow if you tap the top lightly.
Step 8: Cool and Enjoy
Brush the freshly baked loaves with melted butter for an extra soft crust.
Let the bread rest in the pans for 10 minutes, then transfer to a wire rack.
Allow the loaves to cool completely before slicing into delicious, pillowy pieces.
Bread Making Tips For Soft White Loaf
Saving Fresh-Baked White Bread
White Bread Serving Ideas
White Bread from Scratch Baked New Ways
FAQs
Foamy yeast confirms it’s active and alive, which is crucial for bread rising properly. If the yeast doesn’t foam, it means it’s dead and won’t help your bread develop volume and texture.
The dough should feel smooth, elastic, and slightly tacky. When you stretch a small piece, it should form a thin, translucent “windowpane” without tearing, indicating gluten development.
Absolutely! You can knead the dough by hand on a clean surface. Hand-kneading takes about 8-10 minutes and provides a great arm workout while developing the bread’s texture.
All-purpose flour is perfect for this recipe. It provides the right protein content for a soft, tender crumb and consistent rise in your homemade bread.
Print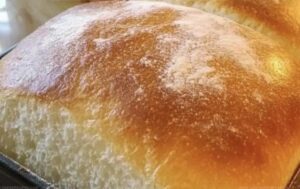
The Best White Bread from Scratch Recipe
- Total Time: 50 minutes
- Yield: 2 1x
Description
Homemade “white bread from scratch” brings warmth and comfort straight from your kitchen’s heart. Fresh ingredients and simple techniques combine to create a classic loaf that connects family and tradition with each delicious slice you’ll savor.
Ingredients
Main Dry Ingredients:
- 5.5 to 6 cups all-purpose flour
- 2.25 teaspoons (1 packet) active dry yeast
- 2 tablespoons granulated sugar
- 1.5 teaspoons salt
Liquid Ingredients:
- 0.25 cup unsalted butter, melted
- 2 cups warm water (about 110°F/45°C)
Finishing Ingredient:
- Extra melted butter (for brushing loaves)
Instructions
- Prepare the yeast catalyst by whisking warm water, sugar, and active dry yeast in a petite vessel. Allow the mixture to bloom and become frothy, indicating the yeast’s vitality, which typically takes 5-10 minutes.
- In a capacious mixing receptacle, amalgamate flour and salt. Incorporate the effervescent yeast solution and melted butter, stirring until a cohesive, slightly tacky dough emerges.
- Methodically integrate the remaining flour, kneading persistently until the dough transforms into a smooth, elastic texture. This process demands approximately 8-10 minutes of manual manipulation or 5 minutes with a mechanical mixer.
- Transfer the developed dough into a lightly greased container, ensuring complete surface coverage. Drape with a pristine cloth and position in a temperate environment, permitting the dough to expand and double in volume within 1-1.5 hours.
- Deflate the risen dough by pressing down firmly. Segment into two uniform portions, meticulously sculpting each into a loaf-like configuration. Nestle these formations into greased 9×5-inch baking vessels.
- Envelop the pans, allowing the dough to undergo a secondary expansion until it crests approximately 1 inch above the pan’s rim, typically requiring 30-45 minutes.
- Calibrate the oven to 375°F (190°C). Position the loaves and bake until the surfaces achieve a golden-bronze hue and emit a hollow resonance when gently tapped, approximately 25-30 minutes.
- Enhance the crust’s tenderness by delicately brushing with liquefied butter. Allow the loaves to rest within the pans for 10 minutes before transferring to a wire cooling platform, ensuring complete temperature stabilization prior to slicing.
Notes
- Warm water temperature matters critically for yeast activation; aim for 110-115°F to ensure proper proofing without killing the yeast.
- Humidity and flour brand can affect dough consistency, so adjust flour quantity gradually and learn to feel the right dough texture.
- Kneading develops gluten networks, creating bread’s signature chewy structure; longer kneading produces a more refined, lighter loaf.
- For gluten-free variation, swap wheat flour with a blend of rice, potato, and tapioca starch, adding xanthan gum for binding.
- Prep Time: 20 minutes
- Cook Time: 30 minutes
- Category: Breakfast, Snacks, Dinner
- Method: Baking
- Cuisine: American
Nutrition
- Serving Size: 2
- Calories: 280
- Sugar: 2 g
- Sodium: 300 mg
- Fat: 8 g
- Saturated Fat: 5 g
- Unsaturated Fat: 3 g
- Trans Fat: 0 g
- Carbohydrates: 48 g
- Fiber: 2 g
- Protein: 7 g
- Cholesterol: 15 mg
Katherine Pierce
Recipe Curator & Food Educator
Expertise
Education
Boston University Metropolitan College
Certificate Program in the Culinary Arts
Focus: French and international cuisine techniques, Hands-on culinary training with industry professionals, Food industry insights and operations
Katherine grew up believing every dish has a story. She studied the art of food at Boston University and explored the history behind it. She loves pulling easy recipes from every corner of the world and putting them at your fingertips.
When Katherine’s not writing or testing new flavors, she’s teaching cooking classes, baking colorful mooncakes, or dreaming up new ways to mix old favorites with new twists.